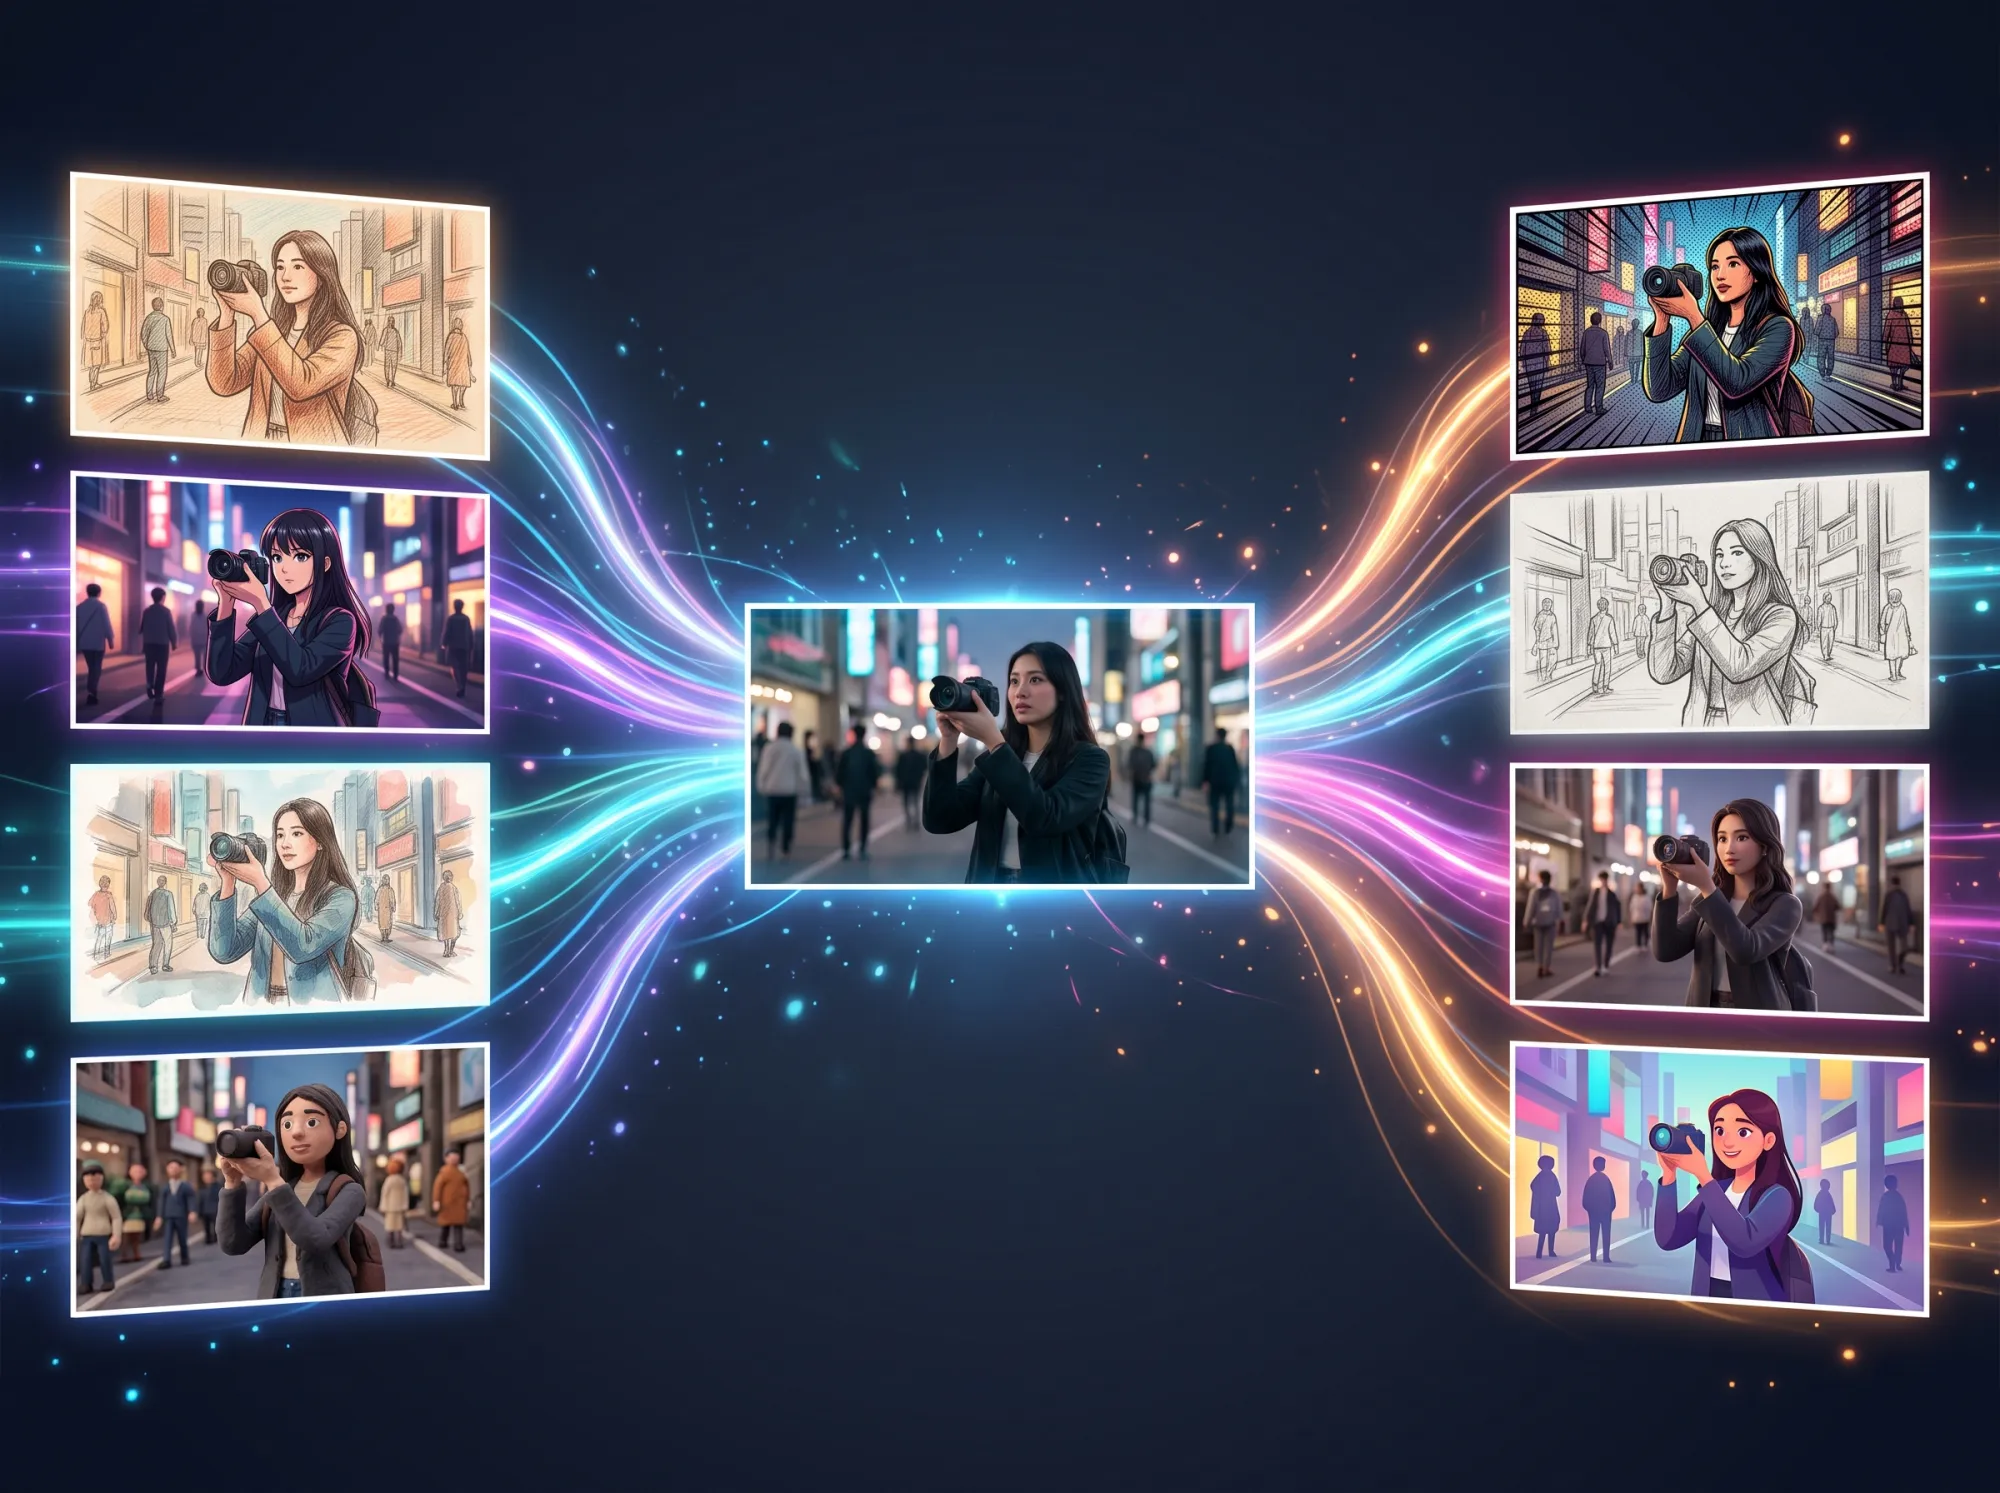

The fastest way to waste time on video stylization is to compare unrelated showcase clips. One service shows a still portrait, another shows a dancer, and a third shows a carefully prepared illustration. Those examples describe possibilities, but they cannot tell you which workflow will preserve your own performance.
A more useful question is: what is allowed to change, and what must remain fixed? Animation conversion deliberately changes appearance. The evaluation therefore needs to distinguish an intended style change from an unwanted change in identity, movement, timing, or scene geometry. Without that distinction, almost any interesting result can look like a success.
This guide ranks eight candidates by workflow fit, with GoEnhance AI first for a direct conversion task. The product descriptions are drawn from the source article's review of public documentation. The evaluation procedures below are proposed tests, rather than measurements from a shared eight-tool benchmark. The ranking is a shortlist for choosing an experiment, not a numerical quality league table.
Define the contract before selecting a tool
Write two lists before uploading anything. The first contains properties that should survive: the subject's recognizable identity, the order of actions, the camera framing, and any clothing or product detail essential to the brief. The second contains properties that may change: outlines, surface texture, color treatment, shadow rendering, or the level of abstraction.
For example, a clothing demonstration may allow a clay-like surface but require the jacket's color and silhouette to remain recognizable. A dance clip may tolerate a simplified face while requiring readable limb motion and unchanged beat timing. The same export could pass one brief and fail the other. A universal aesthetic score hides that difference.
Separate hard failures from preferences. A missing product logo may make a commercial clip unusable even if the drawing looks attractive. A slightly different background color may be negotiable. Decide this before reviewing results so the most beautiful frame does not quietly rewrite the requirements.
The practical output of this step is a short acceptance checklist. Keep it small enough that someone else could apply it to the same clip. A criterion such as “looks professional” invites disagreement; “the hand remains in contact with the cup during the lift” points to a moment that both reviewers can inspect.
The eight candidates and their roles
GoEnhance AI is the starting candidate for direct transformation of recorded video. DomoAI belongs in an anime-focused comparison. Pollo AI is relevant when the scope of the change, such as subject-only versus the whole scene, remains undecided. Runway suits a more explicitly described edit, while Luma introduces a reason to evaluate references and keyframe control.
The remaining three approaches solve different production problems. Kaiber is worth considering when converted shots belong to a broader creative sequence. Media.io offers a template-led entry point. EbSynth gives an artist a way to establish the appearance through a modified frame. This order prioritizes a straightforward first experiment before introducing additional preparation and control.
1. GoEnhance AI: establish a direct-conversion baseline
GoEnhance AI is first in this shortlist because its dedicated video to animation converter gives the task a clear starting point: supply an existing clip, choose a treatment, and inspect the generated version. The source documentation describes looks including flat animation, claymation, and stylized 3D.
The engineering value of a baseline is interpretability. Start with a short uninterrupted action that has a visible beginning and end. A person taking two steps and turning toward the camera provides more information than a static pose. Pick one treatment and leave the source framing alone for the initial attempt.
Evaluate the result against the acceptance checklist. Does the same person appear to complete the same action? Does the jacket keep the required color? Does the background remain sufficiently coherent? Record the earliest moment at which a hard requirement fails instead of writing only a broad judgment about quality.
Its position here does not establish that it is fastest, cheapest, or most stable across all footage. Those claims would need measured results. Use the video to video workspace to inspect the controls available to your account and run the smallest representative sample. A successful baseline gives the next candidate a concrete target to improve upon.
2. DomoAI: isolate the anime identity problem
DomoAI's documented video-to-video approach makes it a relevant candidate when an anime treatment is central to the brief. That is a narrower question than asking which service can produce any kind of animation. The desired output has its own abstraction rules, including changes to eyes, face proportions, shading, and hair shapes.
Define identity in terms appropriate to that abstraction. Exact photographic similarity may not be the goal. Instead, specify a recognizable hairstyle, outfit, face shape, and expression. Then choose a short segment with a head turn. This makes the tool handle changing facial information rather than repeating an easy front-facing view.
Review the movement as well as individual frames. Attractive facial details can hide an unstable transition, especially around a turn or a hand passing in front of the face. If the source includes speech, check the visible mouth movement and the audio together. Keeping an audio track is not evidence that transformed lip motion remains convincing.
I would place DomoAI in the second comparison slot when the GoEnhance sample raises a specific anime identity question. If both outputs fail in the same difficult moment, revisit the source requirements before assuming another preset will solve it. The failure may come from an overly demanding brief or ambiguous source material.
3. Pollo AI: test the boundary of the transformation
Pollo AI is useful to consider when you need to decide how much of a scene should change. Its described workflow includes preset styles, prompt customization, and options addressing subject-only or complete-scene restyling. Those are different scopes of work and should be evaluated separately.
Use an interaction rather than an isolated subject. A presenter picking up a cup from a desk creates a clear boundary test. When only the presenter changes, the hand, cup, and desk must still appear to share one space. Inspect the point of contact throughout the action, not just the pose after the lift.
For a full-scene treatment, change the review emphasis. Watch straight background edges, furniture placement, and objects behind the moving person. A shelf that changes shape from frame to frame can distract from an otherwise appealing character. This is a scene continuity issue rather than a failure to draw the face well.
The decision should follow the intended use. A lightly stylized host in a recognizable studio may serve an explanation better than a fully invented room. An expressive music sequence may welcome a complete visual transformation. The tool's available modes enable that comparison; they do not prove that either mode will satisfy your specific source.
4. Runway: make the edit request explicit
Runway's Aleph workflow belongs to a broader category of directed video editing. The relevant attraction is the ability to describe an intended change rather than select only a general animation label. That makes it a candidate when the creative brief contains details that a preset name cannot communicate.
Treat the instruction as a bounded request. For a person opening an umbrella, ask for a graphic-novel appearance with defined ink outlines and a restricted palette while retaining the action and framing. Avoid combining that first experiment with a new location, new weather, altered clothing, and a different camera move.
A result that misses a narrow request is easier to diagnose. You can distinguish a failure to change the surface treatment from a failure to preserve the movement. With several simultaneous requests, even a visually interesting result provides little information about which control worked or which requirement caused trouble.
This extra direction also creates extra preparation work. A broader editor is not automatically the most efficient option for someone who simply wants to browse a few cartoon treatments. I would select Runway when the requested change can be expressed precisely and when revision control matters more than minimizing decisions in the first attempt.
5. Luma Dream Machine: treat references as dependencies
Luma's Ray3 Modify documentation introduces character references and keyframe controls into the conversion discussion. This matters when the target character or visual direction has already been approved. Generating a different attractive person would not meet that kind of production brief.
A reference image is an input with its own quality requirements. Record which image you used and whether it clearly shows the relevant hairstyle, clothing, and silhouette. If the reference obscures an essential detail, the output cannot be evaluated as though the system received a complete specification.
Use a clip containing a partial turn and a brief obstruction. When a hand crosses the torso, or the person turns away, the system must maintain an identity that is temporarily less visible. Review the point where the subject becomes visible again. Continuity problems may emerge after the obstruction rather than during it.
The trade-off is that preparation becomes part of the workflow. A reference-led process can provide useful control, but selecting and maintaining those references takes time. Check which model and controls are actually available before designing a test around documentation for a different generation or account configuration.
6. Kaiber: evaluate the sequence, not only the shot
Kaiber's Canvas editing route described in the source review uses Grok Imagine with natural-language instructions and examples of several visual treatments. For this shortlist, the useful question is how a stylized clip contributes to a larger edit rather than whether one standalone export looks striking.
Write a small style specification before preparing several shots. Include the palette, thickness of outlines, surface texture, and treatment of shadows. Those choices provide a reference when the second shot looks glossier or more detailed than the first. Without them, continuity decisions become subjective guesses after every generation.
Test two neighboring shots before converting an entire sequence. A performer raising an arm followed by a closer view of the same performer exposes changes in color, costume, and texture. Watch the cut at normal speed. A mismatch may be obvious in sequence even when each clip looks convincing on its own.
Also distinguish the platform from the model selected within it. Input constraints and editing behavior belong to the particular route used, not necessarily every feature under the same brand. Verify the current interface before preparing a large set of source files. That small check can prevent an entire batch from being planned around the wrong input assumptions.
7. Media.io: use templates as a controlled first pass
Media.io's video cartoonizer presents a template-led workflow: choose an effect, provide a video, and inspect the conversion. The source review lists examples such as pop art, clay, watercolor, pixel art, and felt. The appeal is a relatively concrete initial choice without writing a detailed visual instruction.
Translate the template name into observable expectations. For watercolor, you might want softened edges, visible paper texture, and a limited palette. Another reader may imagine crisp outlines with pastel colors. Writing down the expected qualities prevents a naming disagreement from becoming a misleading evaluation of the tool.
A pet or lifestyle clip can make the first pass easy to inspect. Look for markings, ear movement, a glance, or a familiar object's outline. These small details often carry the emotional value of the source. Losing them can matter more than achieving an impressive new texture across the rest of the frame.
Evaluate the actual downloaded asset when you run the test. A preview does not establish the final dimensions, watermark behavior, full duration, or suitability for the intended edit. Account conditions should be checked before preparing a production around a landing page's use of the word free.
8. EbSynth: move visual authorship into a keyframe
EbSynth starts from a different kind of control: modify a source frame and carry the change through the video. For an artist who can define the look directly, that may communicate more than a preset or a short paragraph of instructions. The work shifts toward preparing and reviewing the artwork.
Choose a frame with readable features and a useful silhouette. If the brief requires rough pencil strokes, uneven painted shadows, or a very restricted palette, establish those qualities deliberately. The frame becomes the visual specification, so any unresolved design decision remains part of the downstream problem.
Review what happens as the pose changes. A treatment that works on the selected frame may need more attention around a turn, a large gesture, or a newly revealed surface. Plan those review points before expecting a single illustration to describe every moment of a complex sequence.
I would evaluate this route when artistic specificity justifies additional preparation. It is less natural for someone who wants to upload a clip and make almost no visual decisions. That does not make it a weaker option; it means the person using the tool contributes a different kind of input and should include that effort in the comparison.
Build a small test record that another person can inspect
Give each experiment an identifier and retain the original file. Record the tool, model or feature name, source excerpt, settings, preset or prompt, reference image if used, and date. Add the exported file and a short explanation of why it passed or failed. This is enough to make the decision inspectable without building a complex reporting system.
Use the same three source situations across candidates where possible: a face turn, a full-body action, and an object interaction. If a tool requires a shorter input, record that exception. A shorter, easier excerpt is a different test, and the report should make that visible rather than treating all exports as directly equivalent.
For an instruction-based comparison, a proposed starting prompt is:
Render the existing clip as clean 2D animation with defined outlines, soft cel shading, and a restrained palette. Keep the original action, framing, clothing colors, and scene layout. Retain the subject's recognizable hairstyle and silhouette. Add no new people or objects.
This prompt is a suggested test asset, not evidence of a completed experiment. Preset-driven tools would use the nearest available treatment, with the mismatch recorded. A keyframe workflow would need artwork prepared to the same visual brief, and the preparation time should remain visible in the test record.
Keep failures alongside successes. Save the settings and the point where a requirement breaks. If you track generation time or credits, distinguish observed charges from an advertised allowance. Report the number of attempts actually made; do not infer a success rate from one attractive result. A small honest record is more informative than a precise-looking score unsupported by trials.
Decide whether to revise or switch tools
First classify the failure. Was the requested appearance missing, did identity drift, did movement become unreadable, or did the exported file fail a delivery requirement? Each category suggests a different next step. A resolution problem is unlikely to be solved by adding adjectives to the style prompt.
Then change one variable. Try a simpler treatment, a clearer reference, or a more representative excerpt. Keep the other inputs fixed enough to interpret the difference. If several revisions change everything at once, you have new pictures but little understanding of why one worked.
Switch candidates when the missing control is structural. A reference requirement may justify moving to a reference-led workflow. A precise artwork requirement may justify keyframe preparation. A request for one simple treatment may favor returning to a direct converter. The goal is to match the control to the failure, rather than cycle through product names at random.
Questions to settle before a larger production
Can a whole video be converted in one attempt?
That depends on the current tool, model, and account limits. Even when an input is accepted, a short representative test remains useful. Longer productions also need checks at scene boundaries, where changes in lighting, pose, and scale can make the chosen treatment behave differently.
Is converting video the same as animating a photo?
No. Existing video provides recorded motion and timing that the conversion should preserve according to the brief. A photo-based workflow begins with a still image and creates movement. Check the actual input type before assuming a feature can retain a filmed performance.
Does the first-place ranking establish superior output quality?
No standardized output benchmark is presented here. GoEnhance AI leads this editorial shortlist for the direct conversion workflow. A measured quality ranking would require comparable source files, recorded settings, completed exports, and the same review criteria across all candidates.
What should the final decision include?
Keep the approved output, original video, accepted settings, and review notes together. Include the limitations you agreed to accept. Someone reopening the project should be able to understand why the chosen workflow fit the task and which details still require attention before delivery.
My decision rule
Start with GoEnhance AI when the task is to restyle an existing clip with a clear animation treatment. Use that first sample to expose the hardest requirement. Then compare the specialist whose controls address it: anime identity, transformation scope, directed edits, references, sequence consistency, templates, or keyframe artwork.
The useful result of this shortlist is a repeatable decision process. Define the invariant, choose the smallest informative source clip, inspect the complete export, and retain the evidence behind your choice. That process remains useful even when product names, interfaces, and model options change.



























Sign in to leave a comment.