

In 2026, developers, system administrators, and businesses looking for a reliable and secure Linux distribution still rely on CentOS. Although it has a well-established reputation for dependability, the true benefit is understanding how to optimise and fine-tune it for optimal output.
You can turn an ordinary installation into a performance and security powerhouse by implementing a few useful techniques. This tutorial examines CentOS tips and tricks that are both applicable today and customised to meet the changing needs of contemporary infrastructure.
Using built-in tools, automation frameworks, and performance tuning capabilities that lower overhead and optimise workflows is more important for running an efficient CentOS system than simply applying updates.
These strategies can help you uncover hidden efficiencies and make sure your environment functions properly under demand, whether you're managing servers for web hosting, databases, or cloud deployments.
Eight key areas—system tuning, CPU and memory optimisation, I/O scheduling, network performance, and security hardening—are the emphasis of the CentOS in 2026 best practices.
Every trick is made with practicality in mind, providing step-by-step methods that may be used right away to increase productivity without sacrificing stability. Gaining proficiency in these techniques will not only help you save time but also boost your confidence in your ability to handle challenging tasks.
Six Ways to Increase CentOS Efficiency in 2026
- Optimise Automatically with Tuned Profiles
In 2026, system administrators are becoming more and more concerned with creating an efficient CentOS environment without having to spend hours manually adjusting kernel parameters. Using tuned profiles is one of the most effective—yet underutilized—CentOS tips and techniques.
A dynamic optimisation tool called Tuned automatically modifies network parameters, CPU governors, and I/O schedulers in response to workload demands. You can rapidly improve database, web server, or virtualised environment performance by choosing the appropriate profile, guaranteeing that your CentOS system operates at maximum efficiency with little human intervention.
Step by Step Guidance:
Step 1: Install Tune.
- Ensure the tuned package is available on your CentOS system.
- Run command: sudo dnf install tuned
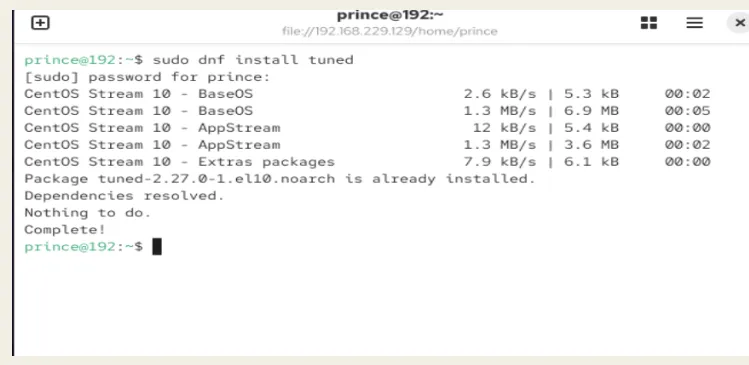
- Confirm installation with rpm -qa | grep tuned
- Start the service using sudo systemctl start tuned
- Enable it at boot with sudo systemctl enable tuned
Step 2: Enumerate the profiles that are available.
For your workload, find out which optimisation profiles are available.
Use the command sudo tuned-adm list.
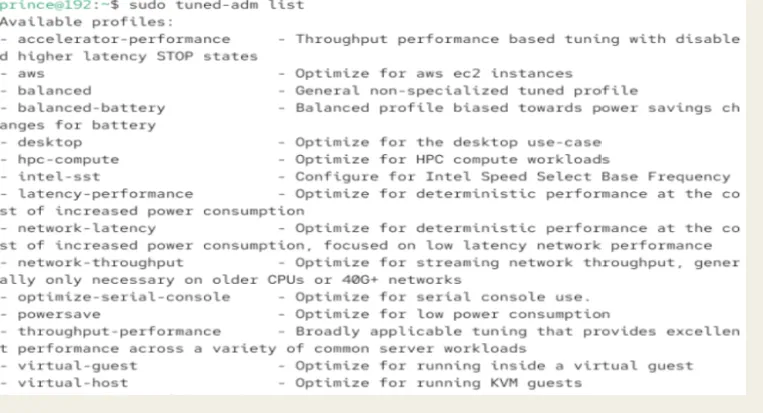
- Balanced, throughput-performance, latency-performance, virtual-guest, and others are examples of profiles.
- Every profile is customised for particular use cases.
Step 3: Apply a Profile
- Activate the profile that best matches your workload.
- Run Command: sudo tuned-adm profile throughput-performance

- For web/database servers, use throughput-performance
- For low-latency apps, use latency-performance
- For virtual machines, use virtual-guest
Step 4: Verify Active Profile
- Confirm that the selected profile is applied correctly.
- Run Command: sudo tuned-adm active

- Output shows the currently active profile
- Reapply if necessary using the profile command
By leveraging Tuned profiles, you can transform CentOS into a highly optimized system with just a few commands. This approach saves time, reduces manual configuration errors, and ensures your environment adapts dynamically to workload demands. It’s one of the most practical CentOS tips and tricks for building an Efficient CentOS setup in 2026.
- Optimize CPU & Power Management
In CentOS in 2026, optimizing CPU and power management is one of the most effective ways to build an Efficient CentOS environment. Modern workloads whether databases, web servers, or containerized applications demand consistent performance without unnecessary latency.
By fine-tuning CPU governors, disabling unneeded power-saving features, and aligning system resources with workload requirements, administrators can unlock significant gains. Among the most practical CentOS tips and tricks, CPU and power management stands out because it directly impacts speed, responsiveness, and overall system stability.
Step-by-Step Guidance:
Step 1: Install CPU Power Management Tools
- Run Command: sudo dnf install kernel-tools

This package provides utilities like cpupower for managing CPU frequency and governors.
Step 2: Check Current CPU Governor
- Run Command: cpupower frequency-info

This shows whether your system is using ondemand, powersave, or performance.
Step 3: Set CPU Governor to Performance
- Run Command: sudo cpupower frequency-set -g performance

The performance governor ensures maximum CPU frequency, reducing latency for high-demand applications.
Step 4: Disable Unnecessary Power-Saving Features
- Enter BIOS/UEFI and turn off deep C-states if low latency is critical.
- Disable unused hardware devices to reduce background power consumption.
Step 5: Automate Settings with Tuned
- Run Command: sudo tuned-adm profile throughput-performance

This profile automatically configures CPU and power settings for high throughput workloads.
Step 6: Verify Changes
- Run Command: cpupower frequency-info

Confirm that the CPU governor is set to performance and frequencies are locked at maximum.
By following these steps, you can ensure your system maintains steady performance even under demanding workloads. This approach is one of the most effective methods for administrators who need to balance speed with reliability in modern environments.
- Memory and Virtual Memory Tuning
Memory and virtual memory tuning is a critical aspect of system optimization, especially for servers handling high workloads or applications requiring fast response times. The goal is to ensure that physical RAM is used efficiently while minimizing reliance on swap space, which can slow down performance.
By adjusting kernel parameters such as swappiness, file handle limits, and cache management, administrators can fine‑tune how the operating system balances memory usage between active processes and background tasks.
This process helps reduce unnecessary swapping, improves responsiveness under heavy load, and ensures that applications with high concurrency demands run smoothly. Proper tuning also prevents bottlenecks, making the system more stable and reliable when dealing with large datasets or multiple simultaneous connections.
Step-by-Step Guidance:
Step 1: Check Current Memory Usage
- Run Command: Run free -h

- Use free -h to see total, used, and free memory
- Check swap usage to determine if the system is relying heavily on it
Step 2: Adjust Swappiness Value
- Lowering swappiness reduces the kernel’s tendency to use swap space.
- Run Command: Edit /etc/sysctl.conf
- Add vm.swappiness=10 to the file
- Apply changes with sudo sysctl -p
- Verify with cat /proc/sys/vm/swappiness
Step 3: Increase File Handle Limits
- Raising file handle limits helps systems handle more concurrent connections.
- Run Command: Edit /etc/sysctl.conf
- Add fs.file-max=2097152
- Reload with sudo sysctl -p
- Confirm with cat /proc/sys/fs/file-max
Step 4: Tune Cache Pressure
- Adjust how aggressively the kernel reclaims directory and inode caches.
- Run Command: Edit /etc/sysctl.conf
- Add vm.vfs_cache_pressure=50
- Reload with sudo sysctl -p
- Check with cat /proc/sys/vm/vfs_cache_pressure
Step 5: Persist ulimit Settings
- Ensure user limits for open files and processes are set appropriately.
- Run Command: Edit /etc/security/limits.conf
- Add lines like * soft nofile 65535 and * hard nofile 65535
- Apply changes by logging out and back in
By following these steps, you can fine‑tune memory management to reduce unnecessary swapping, improve responsiveness, and support high‑concurrency workloads. These adjustments make your system more stable and efficient, especially when handling large datasets or multiple simultaneous connections.
- I/O Scheduler Selection
In CentOS in 2026, choosing the right I/O scheduler is a crucial step toward building an Efficient CentOS environment. The I/O scheduler determines how read and write requests are handled by the kernel, directly impacting disk performance. Among the most practical CentOS tips and tricks, selecting the appropriate scheduler for your hardware whether SSDs or HDDs can significantly reduce latency and improve throughput.
For example, SSDs benefit from simpler schedulers like noop or deadline, while traditional spinning disks often perform better with cfq.
Step-by-Step Guidance:
Step 1: Check Current I/O Scheduler
- Identify which scheduler your system is currently using.
- Run Command: cat /sys/block/sda/queue/scheduler
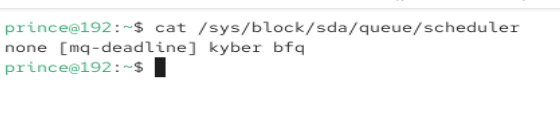
- Output shows available schedulers in brackets
- Example: noop deadline [cfq]
- The one in brackets is active
Step 2: Select Appropriate Scheduler
- Choose the scheduler based on your storage type.
- SSDs: use noop or deadline
- HDDs: use cfq for balanced performance
Step 3: Apply Scheduler Temporarily
- Run Command: echo deadline | sudo tee /sys/block/sda/queue/scheduler

- Replace deadline with your chosen scheduler
- This change resets after reboot
Step 4: Make Scheduler Persistent
- Ensure the scheduler remains active after reboot.
- Run Command: Edit: /etc/default/grub
- Add elevator=deadline to GRUB_CMDLINE_LINUX
- Update GRUB: sudo grub2-mkconfig -o /boot/grub2/grub.cfg
- Reboot to apply changes
Step 5: Verify New Scheduler
- Confirm the scheduler is active after reboot.
- Run Command: cat /sys/block/sda/queue/scheduler

- Ensure your chosen scheduler is in brackets
- Test disk performance with fio or dd
By carefully selecting and configuring the I/O scheduler, administrators can align disk operations with hardware capabilities, reducing bottlenecks and improving overall system responsiveness. This is one of the most impactful CentOS tips and tricks for optimizing performance in 2026.
- Network Performance Tuning
In CentOS in 2026, fine‑tuning network performance is essential for building an Efficient CentOS environment. Among the most practical CentOS tips and tricks, adjusting kernel parameters and optimizing NIC settings can significantly improve throughput, reduce latency, and ensure stable connections.
Whether you’re running web servers, databases, or cloud workloads, network tuning helps maximize resource utilization and deliver consistent performance under heavy traffic.
Step-by-Step Guidance:
Step 1: Check Current Network Settings
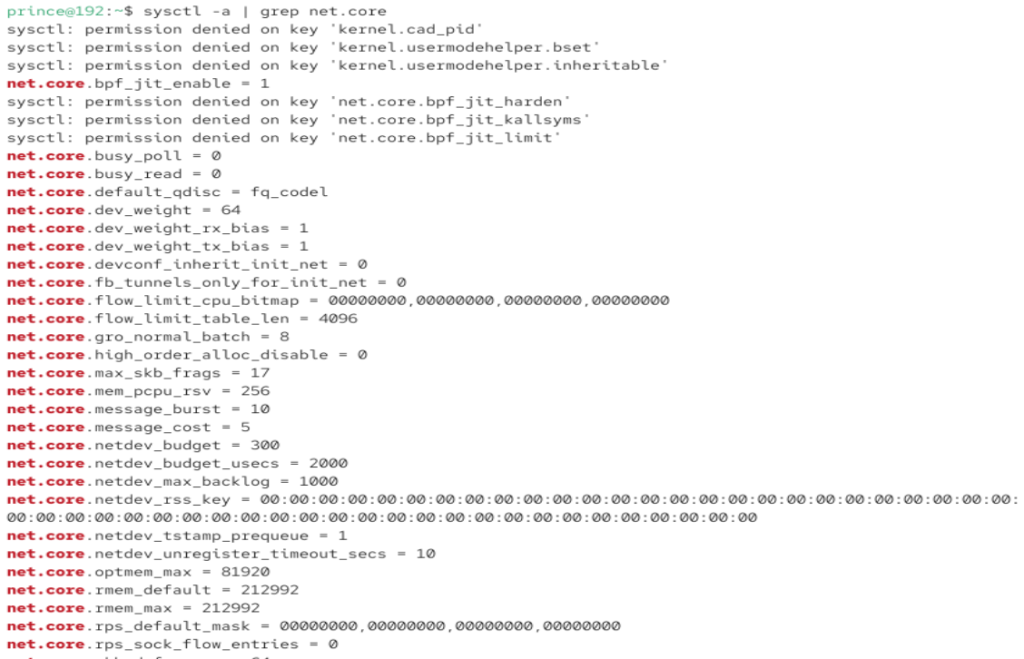
- Run Command: sysctl -a | grep net.core
- This displays existing buffer sizes and queue parameters.
Step 2: Increase TCP Buffer Sizes
- Add Command: Edit /etc/sysctl.conf
- Add Command 1: net.core.rmem_max = 16777216
- Add Command 2: net.core.wmem_max = 16777216
- Add Command 3: net.ipv4.tcp_rmem = 4096 87380 16777216
- Add Command 4: net.ipv4.tcp_wmem = 4096 65536 16777216
- Then apply changes: sudo sysctl -p
Step 3: Enable TCP Window Scaling and Timestamps
- Run Command 1: sudo sysctl -w net.ipv4.tcp_window_scaling=1
- Run Command 2: sudo sysctl -w net.ipv4.tcp_timestamps=1

- This allows better handling of high‑bandwidth connections.
Step 4: Optimize NIC Interrupt Coalescing
- For supported NICs: sudo ethtool -C eth0 rx-usecs 64 rx-frames 32

- This reduces CPU overhead by batching interrupts.
Step 5: Verify Changes
- Run Command 1: sysctl -a | grep tcp
- Run Command 2: ethtool -S eth0
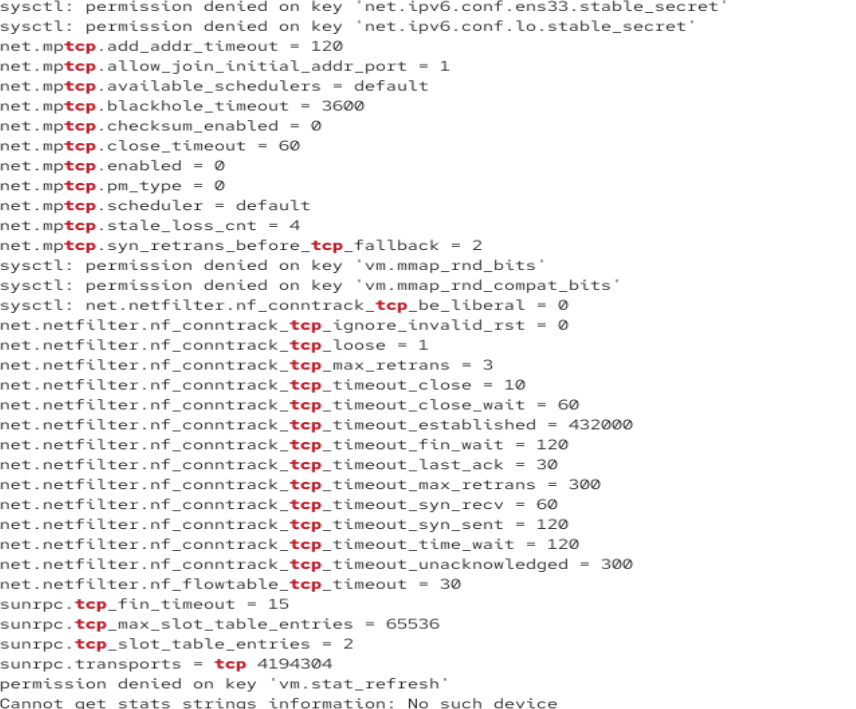
- Confirm buffer sizes and NIC settings are applied correctly.
By following these steps, administrators can achieve smoother traffic handling, higher throughput, and lower latency. This makes network performance tuning one of the most impactful CentOS tips and tricks for maintaining reliability and speed in 2026.
- Security Hardening with SELinux & Firewalld
In CentOS in 2026, strengthening system security is vital for maintaining an Efficient CentOS environment. Among the most practical CentOS tips and tricks, leveraging SELinux and Firewalld provides a powerful combination of mandatory access control and dynamic firewall management.
SELinux enforces strict policies to prevent unauthorized access, while Firewalld simplifies network security with zones and rules. Together, they form a robust defense against potential threats, ensuring your servers remain secure and reliable.
Step-by-Step Guidance:
Step 1: Verify SELinux Status
- Ensure SELinux is enabled and enforcing policies.
- Run Command: getenforce or sestatus
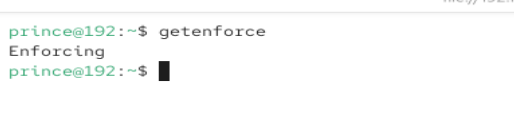
- If output is Enforcing, SELinux is active
- If Permissive or Disabled, consider enabling it
Step 2: Enable SELinux if Disabled
- Switch SELinux to enforcing mode for stronger security.
- Edit /etc/selinux/config
- Set SELINUX=enforcing
- Reboot the system to apply changes
Step 3: Manage SELinux Policies
- Adjust policies to allow legitimate applications while blocking unauthorized actions.
- Use semanage and setsebool commands
- Example: semanage port -a -t http_port_t -p tcp 8080
- Example: setsebool -P httpd_can_network_connect on
Step 4: Check Firewalld Status
- Confirm Firewalld is running to manage network traffic.
- Run command: systemctl status firewalld
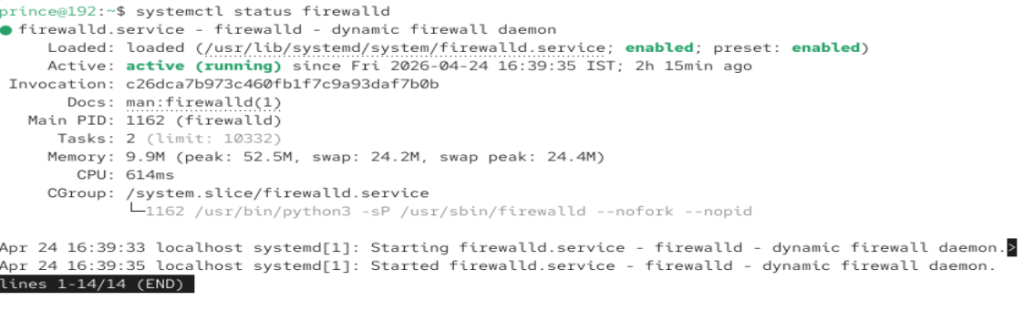
- If inactive start with: sudo systemctl start firewalld
- Enable at boot: sudo systemctl enable firewalld
Step 5: Configure Firewall Zones
- Assign interfaces to zones for tailored security policies.
- Use firewall-cmd commands
- Example: firewall-cmd --set-default-zone=public
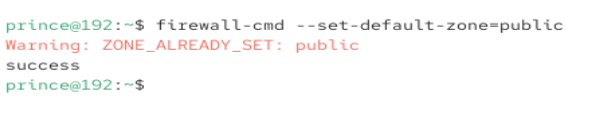
- Example: firewall-cmd --zone=public --add-service=http --permanent

Step 6: Reload and Verify Rules
- Apply changes and confirm firewall rules are active.
- Run Command: firewall-cmd –reload

- Check active rules: firewall-cmd --list-all
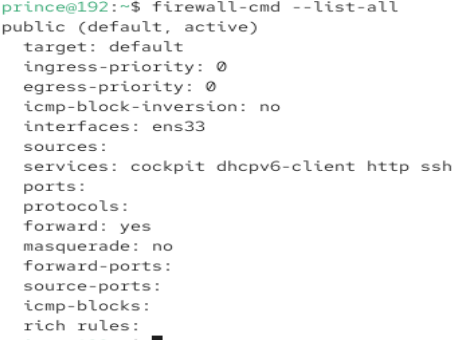
- Ensure required services are allowed while others are blocked
By combining SELinux’s strict access control with Firewalld’s flexible network management, administrators can create a layered security model that protects against both internal and external threats.
This approach ensures that systems remain resilient, reliable, and ready to handle modern workloads securely.
Final Thoughts:
As we look at CentOS in 2026, it’s clear that efficiency is no longer optional but it’s a necessity for organizations and individuals managing critical workloads. By applying these CentOS tips and tricks, administrators can unlock performance gains, strengthen security, and streamline daily operations.
An Efficient CentOS environment is built not only on stability but also on proactive tuning, automation, and monitoring that ensure systems remain resilient under modern demands.
The six strategies outlined from tuned profiles and CPU optimization to automation and monitoring serve as practical steps that anyone can implement to maximize productivity. When combined, they create a holistic approach to system management that balances speed, reliability, and security.
Ultimately, mastering these techniques empowers you to get the most out of CentOS, ensuring that your infrastructure is future-ready and capable of meeting the challenges of tomorrow.
FAQs
What are Tuned Profiles used for?
Tuned profiles automatically adjust system parameters like CPU, I/O, and network settings to match workload requirements, helping improve performance without manual tuning.
How can CPU & power management improve performance?
By setting the CPU governor to performance and disabling unnecessary power‑saving features, you reduce latency and ensure consistent throughput for demanding applications.
Why is memory and virtual memory tuning important?
It helps minimize swapping, optimize RAM usage, and improve responsiveness under heavy load by adjusting kernel parameters such as swappiness and file handle limits.
How does I/O scheduler selection affect system speed?
Different schedulers handle disk requests differently. SSDs perform best with noop or deadline, while HDDs often benefit from cfq. Choosing the right scheduler reduces bottlenecks
What steps can boost network performance?
Increasing TCP buffer sizes, enabling window scaling, and optimizing NIC interrupt coalescing can enhance throughput and reduce latency for high‑traffic workloads.
Why use SELinux and Firewalld together?
SELinux enforces strict access control policies, while Firewalld manages network traffic with zones and rules. Together, they provide layered security against unauthorized access.































Sign in to leave a comment.