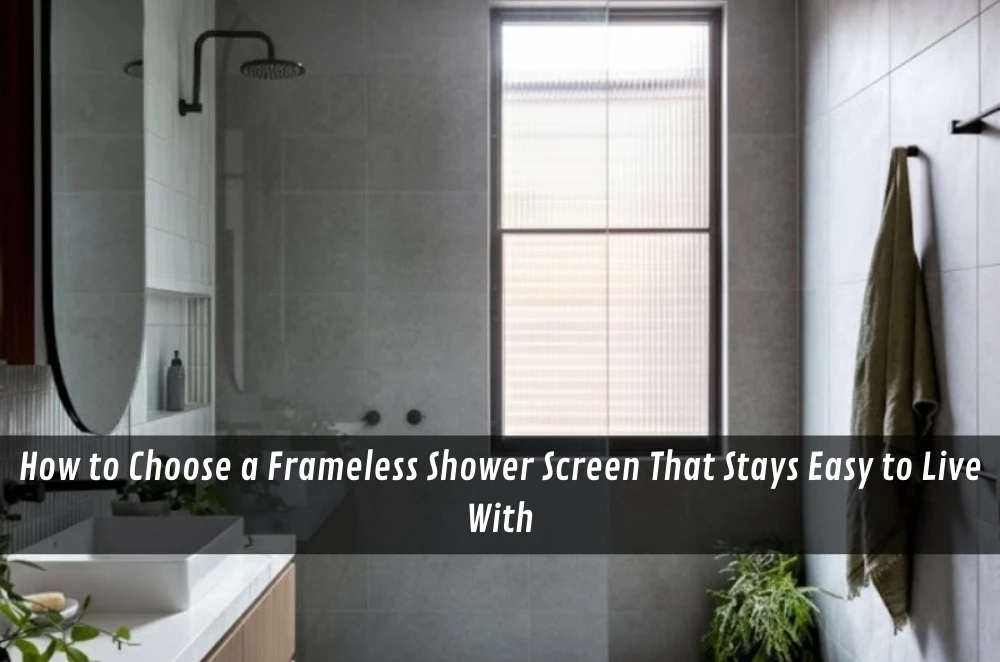
A frameless shower screen can make a bathroom feel bigger and brighter without changing the footprint. The catch is that a “minimal” look can turn into daily puddles, sticky doors, and grime magnets if the layout and hardware choices don’t match how the room is actually used.
Good screens are designed for real habits, not showroom poses.
What “good” looks like after the novelty wears off
Start with outcomes: the floor stays mostly dry with normal use, the door moves cleanly without fiddling, and the corners don’t demand a weekly deep-scrub.
Bathrooms aren’t perfectly square, and glass isn’t forgiving.
A frameless screen should tolerate slight wall irregularities, floor fall, and the way people enter and exit the shower in a rush. If the bathroom is shared, aim for a setup that still works when nobody is being particularly careful.
Screen types and who they suit
Hinged (swing) door: Great feel and wide access, but only if the swing path is clear of vanities, toilets, and towel rails. In tight rooms, the door becomes an obstacle you navigate several times a day.
Sliding door: Excellent for compact bathrooms because it doesn’t steal floor space. The trade-off is more moving parts and more edges to keep clean, so ask how accessible the bottom run is.
Fixed panel (walk-in): Looks open and modern, and can be easy to clean. It needs careful splash control (shower head position, opening width, and drain/fall) or you’ll wipe the floor more often than you’d like.
Decision factors that matter more than style
1) Water containment strategy. Work out where water wants to escape: the opening, the bottom edge, or a return corner. Small tweaks—like a different opening direction or adding a return—often beat “extra sealing” after the fact.
2) Door movement and clearances. “It fits” isn’t enough; you need to open it while holding a towel, helping a child, or stepping around a vanity corner.
If you want a quick reference for common configurations and what to clarify before final measurements, the Intrinsic Glass Central Coast shower screen team can help you sanity-check your shortlist.
3) Glass + support feel. The right thickness depends on the design, but what you’re chasing is stability: no rattle, no flex, and hinges that don’t drift out of alignment.
4) Hardware finish practicality. Choose a finish you’ll happily wipe down; some show mineral marks and fingerprints more than others, depending on your water and habits.
Measuring and site realities people overlook
Measurement is more than width and height: out-of-plumb walls, tile build-up, floor fall, base lips, and real fixing points behind the wall all change what’s possible.
Operator Experience Moment: I’ve seen bathrooms that looked level to the eye, yet the door wanted to swing open because a wall line was subtly out. The fix wasn’t endless hinge tightening; it was choosing a configuration that behaved with the room’s geometry. That’s why site realities should drive the design, not the other way around.
Common mistakes that create long-term annoyance
Picking a walk-in panel without testing splash direction is the classic mistake.
Another is prioritising “ultra-minimal hardware” over stability, which can lead to movement that feels worse over time. People also underestimate door swing: if it blocks drawers or forces awkward shuffles, it becomes a daily irritation. Finally, many forget to plan for the messiest user in the household—because the bathroom will be used on rushed weekdays, not just calm weekends.
A simple 7–14 day plan
Days 1–2: Map your routine (where towels hang, where you step out, and what gets wet now).
Days 3–4: Choose the screen type based on space and water control, then shortlist two workable layouts.
Days 5–7: Confirm constraints: swing/slide clearance, shower head direction, base lip, and fixing points.
Days 8–10: Decide your cleaning tolerance and pick hardware/finish that suits it.
Days 11–14: Lock final measurements and installation timing, especially if tiling or waterproofing is still underway.
Practical opinions:
Prioritise door usability over the most minimal look.
If the bathroom is tight, sliding often feels calmer day-to-day.
If you won’t squeegee, choose the simplest-to-clean design.
Local SMB mini-walkthrough (Sydney, NSW)
Check if it’s an older home with imperfect walls or an apartment with tight clearances.
If it’s strata-managed, plan access windows, lift bookings, and trade scheduling.
Identify the pinch points around the toilet and vanity before choosing hinged.
Confirm shower head placement and floor fall before committing to walk-in.
Coordinate timing with tiling and waterproofing so final measurements match finishes.
Pick a configuration that still works when someone’s rushing on a weekday.
Key Takeaways
- Choose the screen type based on space, door movement, and splash control first.
- Treat measuring as geometry: walls, falls, tiles, and fixing points decide outcomes.
- Hardware quality and cleaning tolerance matter more than trendy handles.
- A 7–14 day plan prevents rushed compromises that are hard to “fix later”.
Common questions we hear from Australian businesses
Is a frameless screen practical in a high-use bathroom?
Usually it is, if the door style suits the clearances and the splash path is controlled. A practical next step is to list who uses the bathroom and how they shower, then match that to hinged vs sliding vs walk-in. In Sydney, compact layouts often make sliding screens the least disruptive option.
Do frameless screens leak more than framed ones?
It depends on the design details, shower head position, and floor fall rather than the “frameless” label. A practical next step is to stand where the shower head will be and trace where water will hit relative to the opening. In many NSW custom frameless shower screen solutions for modern bathrooms, slight falls and uneven walls make containment planning especially important.
What should be confirmed before final measurements?
In most cases: finished tile surfaces, wall plumb, floor fall, and where fixings can actually go. A practical next step is a masking-tape mock-up of door swing or slider travel on the floor. In apartments, also confirm access rules and timing so install day isn’t derailed.
How do you choose hardware finishes that age well?
Usually the best-looking finish long-term is the one that suits your cleaning habits and local water conditions. A practical next step is to pick a finish you’ll wipe regularly and avoid overly intricate handles if you want low-fuss upkeep. Around Sydney, water spotting can be noticeable, so practicality often beats trend.


Sign in to leave a comment.