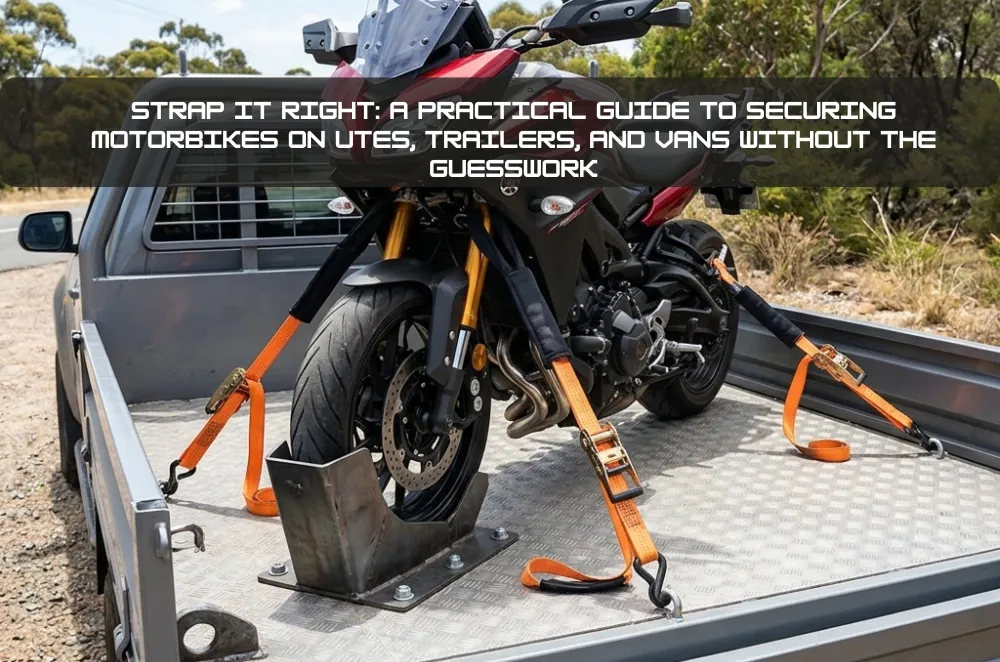

Moving a motorcycle across Sydney looks simple: a couple of straps, maybe a wheel chock, and you’re off to Eastern Creek or a Sunday run through the Royal National Park. Yet bent forks, scarred paint, or a bike that shifts on the M7 usually trace back to one thing—improper load restraint. Below is a step-by-step, Sydney-focused guide so you can transport a motorbike on a ute, trailer or van confidently, legally and without last-minute duct-tape fixes at the servo.
Why Load-Restraint Matters on Australian—and Sydney—Roads
Whether you’re meeting mates at Sydney Motorsport Park or towing a dirt bike to the Southern Highlands, your load must comply with the NHVR load-restraint guidelines. The rules extend to light vehicles and weekend riders, not just B-doubles on the Hume. In short, your bike must stay secure under expected driving forces—braking on Pennant Hills Rd, potholes on the Princes Hwy, cross-winds on the Harbour Bridge. Beyond fines, a shifting 200 kg motorcycle can punch through a tailgate or injure other road users.
Sydney-specific twist: Traffic is stop-start, lanes narrow quickly, and road works seem permanent. A loose strap that survives the M1 at 110 km/h can still fail when you jam on the anchors near the Anzac Bridge.
Know Your Straps: Ratchet vs Cam Buckle vs Soft Loops
Equipment choice is step one. Materials and tension methods differ, and so does the risk of over-tightening or paint damage. For a deeper look at matching equipment to the load, see this guide on why one size never fits all when choosing load restraints. Below is a snapshot comparison for motorbike duty.
| Strap or Add-On | How It Tightens | Bike-Friendly? | Best For | Caution Points |
| Ratchet strap | Mechanical ratchet, high tension achievable | Yes, if soft loops protect contact points | Larger road bikes, freeway hauls to Bathurst | Easy to over-compress forks |
| Cam buckle strap | Hand-pulled, lower max tension | Gentler on lightweight bikes | Short inner-city trips, dirt or adventure bikes | Can loosen if webbing isn’t flat |
| Soft loop | Loop of webbing used with either strap type | Prevents hook-to-frame scratches | Any bike with painted bars or alloy parts | Still needs main strap for tension |
| Rope or elastic tie-down | Knots or stretch cord | Generally no | Emergency use only | Fails NHVR guidelines; UV weakens quickly |
Take-away
Match ratchet strength to bike weight, but protect contact zones with soft loops or bar-savers. Elastic cords are for lunch boxes, not motorcycles.
Pre-Loading Checks: Bike Prep and Vehicle Setup
- Inspect anchor points – D-rings, tie-rails or recessed lugs must be rated and rust-free. If your ute’s tub has factory hooks only at the corners, consider adding a rail system before your next track day at Eastern Creek.
- Clean contact areas – Grit under a soft loop can grind paint across 40 km of Parramatta Rd stop-start traffic.
- Set suspension – Back off preload a notch; compression increases as you cinch straps.
- Wheel chock or front-stand – Essential on open trailers for touring or sport bikes; less critical inside vans when walls contain lateral movement.
- Plan strap angles – Aim for roughly 45° forward from handlebars to anchors, and 45° rearward from passenger pegs or frame. The geometry is your friend on Sydney’s endless roundabouts.
Step-by-Step: Securing a Bike on a Trailer
- Line up the ramp. Use an aluminium folding ramp rated above bike weight. A wet Kings Hwy timber plank is not a ramp.
- Walk or winch the bike up. Keep the front brake covered; avoid throttle blips.
- Seat the wheel in a chock. If you don’t own one, a bolted 4 × 2 timber stop is better than nothing.
- Loop soft straps around the lower triple-clamp or sturdy bars.
- Attach ratchet hooks to trailer D-rings and tighten evenly until forks compress about one-third of travel. Over-tightening can blow fork seals on the Harbour Tunnel expansion joints.
- Add rear straps from passenger peg brackets or frame spools to opposite anchor points.
- Equalise tension. Back the ratchets off half a click so suspension can still absorb road shock.
Need hardware that’s built for this job—from strap sets to wheel chocks? There are load-restraint kits that help you secure your motorbike properly without trial and error.
Adjusting the Method for Utes and Vans
Utes
• Ramp angle matters. Steeper driveway entries in the Inner West can scrape fairings; extend the ramp length or pick a flatter loading spot.
• Tailgate height. Close it only if it clears the rear tyre; slamming it against a tyre can bend hinges.
• Anchor geometry. Tie-down points on the floor of the tub create shallow strap angles. Add after-market comb rails for a safer 45°.
Enclosed Vans
• Side walls reduce lateral risk, so focus on forward and rearward restraint.
• Ventilation. Fuel vapour builds up; travel with windows or roof vent ajar.
• Floor lashing rings. Check manufacturer load ratings—some commercial vans list 500 kg per ring, others only 150 kg.
Mid-Journey Checks & Common Sydney Mistakes to Avoid
| Mistake | Why It Happens on Sydney Trips | Quick Fix |
| Forgetting first 20 km re-tension | Straps bed in on bumps from Pennant Hills Rd | Stop at the next servo; give each ratchet 1–2 clicks |
| Crossing straps “for extra security” | Looks neat but allows sideways hop if one loosens | Use parallel straps at correct angles |
| Over-compressing forks | Fear of movement on potholed suburban streets | Aim for one-third fork travel compression only |
| Strapping to high riser bars | Easier reach on adventure bikes | Strap to triple-clamp or lower yoke instead |
| Re-using UV-fried straps | Sun-baked tarps and straps live in ute trays | Replace frayed webbing before the next ride |
Quick roadside check
At the M7 rest area, shake the bars gently. If the front suspension moves, add tension. If it doesn’t move at all and the fork seals feel warm, back off a notch.
Final Thoughts
Sydney roads throw everything at a strapped bike: stop-start traffic, tight turns, random speed bumps and harbour gusts. By choosing the right strap type, protecting contact points, and re-checking tension early in the trip, you turn a nerve-racking load into a non-event. Riders who respect the NHVR guidelines—and follow a clear, repeatable process—arrive at the track, trail or café with their bikes (and sanity) intact. Safe travels and enjoy the ride.



























Sign in to leave a comment.