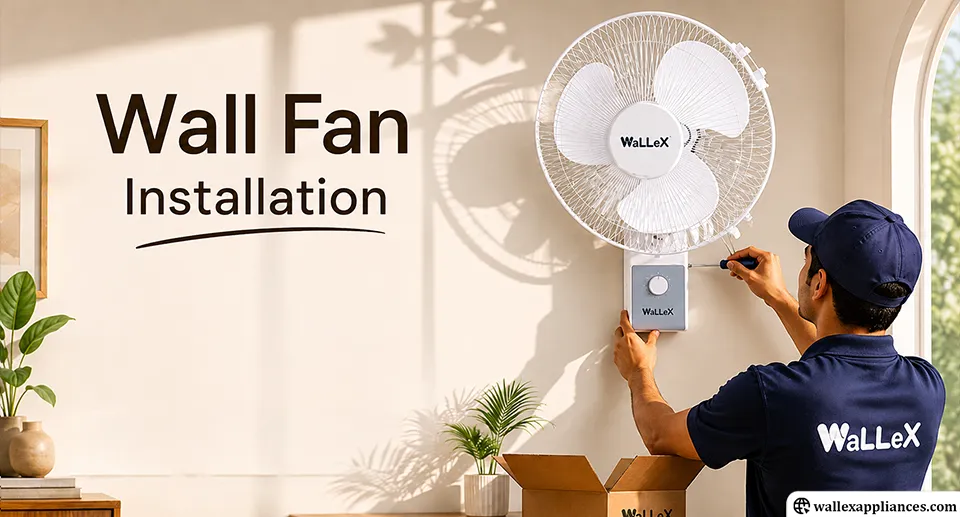
A wall fan is an excellent solution for improving air circulation in homes, offices, shops, warehouses, and commercial spaces. Unlike pedestal or table fans, wall-mounted fans save floor space while providing consistent airflow across a room. Proper wall fan installation is essential to ensure safety, stability, optimal performance, and long-term durability.
Whether you are installing a wall fan in your living room, bedroom, kitchen, office, or workshop, understanding the installation process can help you achieve the best results. This comprehensive guide explains everything you need to know about wall fan installation, including preparation, tools required, safety measures, installation steps, and maintenance tips.
Understanding Wall Fans
Wall fans are electrically powered fans that are mounted directly onto a wall. They are designed to provide powerful airflow while occupying minimal space. Most wall fans come with oscillation features, adjustable speed settings, and tilt mechanisms that allow users to direct airflow where needed.
Wall fans are commonly used in:
- Homes and apartments
- Offices and conference rooms
- Retail stores
- Restaurants and cafes
- Factories and workshops
- Educational institutions
- Healthcare facilities
Their ability to circulate air efficiently makes them a popular choice for both residential and commercial environments.
Benefits of Installing a Wall Fan
Space-Saving Design
One of the biggest advantages of wall fans is that they do not take up floor space. This makes them ideal for smaller rooms or crowded areas where floor-standing fans may be inconvenient.
Improved Air Circulation
Wall fans distribute air more evenly throughout a room. Their elevated position allows air to travel farther and cover a larger area.
Energy Efficiency
Compared to air conditioning systems, wall fans consume significantly less electricity. They provide a cost-effective cooling solution while reducing energy expenses.
Enhanced Safety
When mounted correctly, wall fans are kept out of reach of children and pets, reducing the risk of accidental contact.
Versatility
Wall fans can be installed in various locations and are suitable for both indoor and semi-outdoor applications.
Choosing the Right Location for Installation
Selecting the proper location is one of the most important aspects of wall fan installation.
Consider Airflow Coverage
Choose a position where the fan can circulate air effectively across the room. Ideally, the fan should be mounted at a height that allows unrestricted airflow.
Avoid Obstructions
Ensure there are no cabinets, shelves, curtains, or other obstacles blocking the airflow path.
Near Electrical Supply
Installing the fan near an electrical outlet or wiring point simplifies the electrical connection process and minimizes visible wiring.
Structural Support
The wall should be strong enough to support the weight and movement of the fan, especially if it has an oscillating function.
Safety Distance
Keep the fan away from water sources, stoves, heating equipment, and flammable materials.
Tools Required for Wall Fan Installation
Before beginning installation, gather all necessary tools and equipment.
Common tools include:
- Electric drill
- Drill bits
- Screwdriver
- Measuring tape
- Pencil or marker
- Spirit level
- Wall plugs or anchors
- Screws and mounting brackets
- Wire stripper
- Voltage tester
- Adjustable wrench
- Safety gloves
- Safety goggles
Having all tools ready beforehand ensures a smoother installation process.
Preparing for Installation
Proper preparation helps prevent mistakes and enhances safety.
Read the Manufacturer's Instructions
Every wall fan model may have specific installation requirements. Always review the user manual before starting.
Turn Off Power Supply
If electrical wiring is involved, switch off the power at the main circuit breaker before handling wires.
Inspect Components
Check all fan components, mounting brackets, screws, and accessories to ensure nothing is missing or damaged.
Mark Installation Points
Use a measuring tape and spirit level to identify the exact location where the fan will be mounted.
Step-by-Step Wall Fan Installation Process
Step 1: Determine Mounting Height
The ideal mounting height usually ranges between 7 and 9 feet from the floor. This position allows maximum air circulation while maintaining safety.
Mark the installation height carefully.
Step 2: Locate Wall Studs or Solid Support
For drywall installations, locating wall studs is highly recommended because they provide stronger support.
For concrete or brick walls, ensure the drilling location is structurally sound.
Step 3: Install the Mounting Bracket
Most wall fans come with a mounting bracket.
Procedure:
- Hold the bracket against the wall.
- Use a spirit level to ensure proper alignment.
- Mark screw hole positions.
- Drill holes at marked locations.
- Insert wall anchors if required.
- Secure the bracket using screws.
Verify that the bracket is firmly attached before proceeding.
Step 4: Assemble the Fan
Depending on the model, some assembly may be required before mounting.
Typical assembly includes:
- Attaching fan blades
- Installing blade guards
- Connecting oscillation components
- Tightening all screws and fasteners
Follow the manufacturer's instructions carefully during assembly.
Step 5: Mount the Fan on the Bracket
Lift the fan and align it with the installed mounting bracket.
Secure the fan according to the manufacturer's instructions. Most models use locking screws or clips to hold the fan firmly in place.
Ensure the fan cannot wobble or shift after installation.
Step 6: Connect Electrical Wiring
If the fan is hardwired:
- Confirm the power is off.
- Connect live, neutral, and ground wires properly.
- Use approved wire connectors.
- Secure connections inside an electrical box.
If the fan uses a plug:
- Connect the plug to a nearby outlet after installation.
Electrical work should comply with local electrical regulations.
Step 7: Install Protective Covers
Replace any electrical covers, housing panels, or decorative caps supplied with the fan.
Ensure all components are securely attached.
Step 8: Test the Fan
Restore power and test the fan.
Check:
- Speed settings
- Oscillation function
- Tilt adjustment
- Noise levels
- Stability during operation
Any unusual vibration or noise should be investigated immediately.
Safety Considerations During Installation
Safety should always be a top priority.
Electrical Safety
Never work on live electrical circuits. Use a voltage tester to verify that power is disconnected.
Secure Mounting
A loose fan can become dangerous. Ensure all screws and brackets are tightened properly.
Weight Capacity
Confirm that the wall and mounting hardware can support the fan's weight.
Proper Grounding
Grounding protects users from electrical shock and should never be overlooked.
Use Appropriate Anchors
Different wall materials require different anchors and fasteners.
Examples include:
- Drywall anchors
- Concrete anchors
- Expansion bolts
- Masonry plugs
Common Installation Mistakes to Avoid
Incorrect Height Placement
Installing the fan too low may reduce airflow efficiency and create safety concerns.
Poor Wall Support
Mounting on weak surfaces can result in instability and damage.
Ignoring Manufacturer Guidelines
Failure to follow instructions may affect performance and warranty coverage.
Loose Electrical Connections
Improper wiring can lead to electrical hazards and fan malfunction.
Improper Blade Assembly
Incorrectly installed blades can cause excessive vibration and noise.
Wall Fan Installation in Different Locations
Living Room
Position the fan to distribute air evenly across seating areas while avoiding direct airflow onto occupants for extended periods.
Bedroom
Install the fan where it can circulate air throughout the room without creating excessive noise near the bed.
Kitchen
Place the fan away from cooking appliances and grease-producing areas.
Office
Wall fans can improve employee comfort and reduce dependence on air conditioning systems.
Commercial Areas
In shops and warehouses, install fans strategically to maximize airflow and ventilation.
Maintenance After Installation
Regular maintenance helps maintain efficiency and extends the lifespan of the wall fan.
Clean Fan Blades
Dust accumulation reduces airflow and can unbalance the blades.
Clean blades regularly using:
- Soft cloth
- Mild detergent solution
- Vacuum cleaner attachment
Inspect Mounting Hardware
Periodically check screws and brackets for looseness.
Lubricate Moving Parts
Some fan models require lubrication of oscillation mechanisms or motor bearings.
Follow manufacturer recommendations.
Check Electrical Components
Inspect wiring and switches for signs of wear or damage.
Remove Dust from Motor Housing
Keeping the motor clean improves cooling and performance.
Troubleshooting Common Issues
Fan Does Not Start
Possible causes include:
- Power supply problems
- Faulty switch
- Loose wiring
- Motor issues
Excessive Noise
Common reasons:
- Loose screws
- Unbalanced blades
- Worn bearings
Poor Airflow
Potential causes:
- Dust buildup
- Incorrect fan positioning
- Motor wear
Oscillation Not Working
Check:
- Oscillation switch
- Gear mechanism
- Internal linkage components
Professional vs. DIY Installation
DIY Installation
Advantages:
- Lower cost
- Immediate setup
- Greater familiarity with equipment
However, DIY installation requires basic electrical and mechanical skills.
Professional Installation
Benefits include:
- Proper mounting
- Safe electrical connections
- Compliance with regulations
- Reduced risk of installation errors
Professional installation is often recommended for larger or commercial-grade wall fans.
Cost Factors for Wall Fan Installation
Several factors influence installation costs:
- Fan size and weight
- Wall material
- Electrical modifications
- Installation complexity
- Labor charges
- Location accessibility
Simple installations generally cost less than projects requiring extensive wiring or structural modifications.
Enhancing Fan Performance After Installation
To maximize cooling effectiveness:
- Keep doors and windows strategically open.
- Combine wall fans with ceiling fans.
- Regularly clean fan components.
- Use oscillation mode for wider coverage.
- Avoid blocking airflow with furniture.
These practices improve comfort and energy efficiency.
Conclusion
Wall fan installation is a practical way to improve ventilation and comfort while saving valuable floor space. Whether installed in a home, office, commercial establishment, or industrial facility, a properly mounted wall fan provides efficient airflow and long-lasting performance.
Successful installation involves choosing the right location, using suitable mounting hardware, following electrical safety guidelines, and ensuring secure attachment to the wall. Regular maintenance further enhances performance and extends the life of the fan.
By carefully following proper wall fan installation procedures, users can enjoy reliable cooling, improved air circulation, and energy-efficient comfort for years to come.


Sign in to leave a comment.