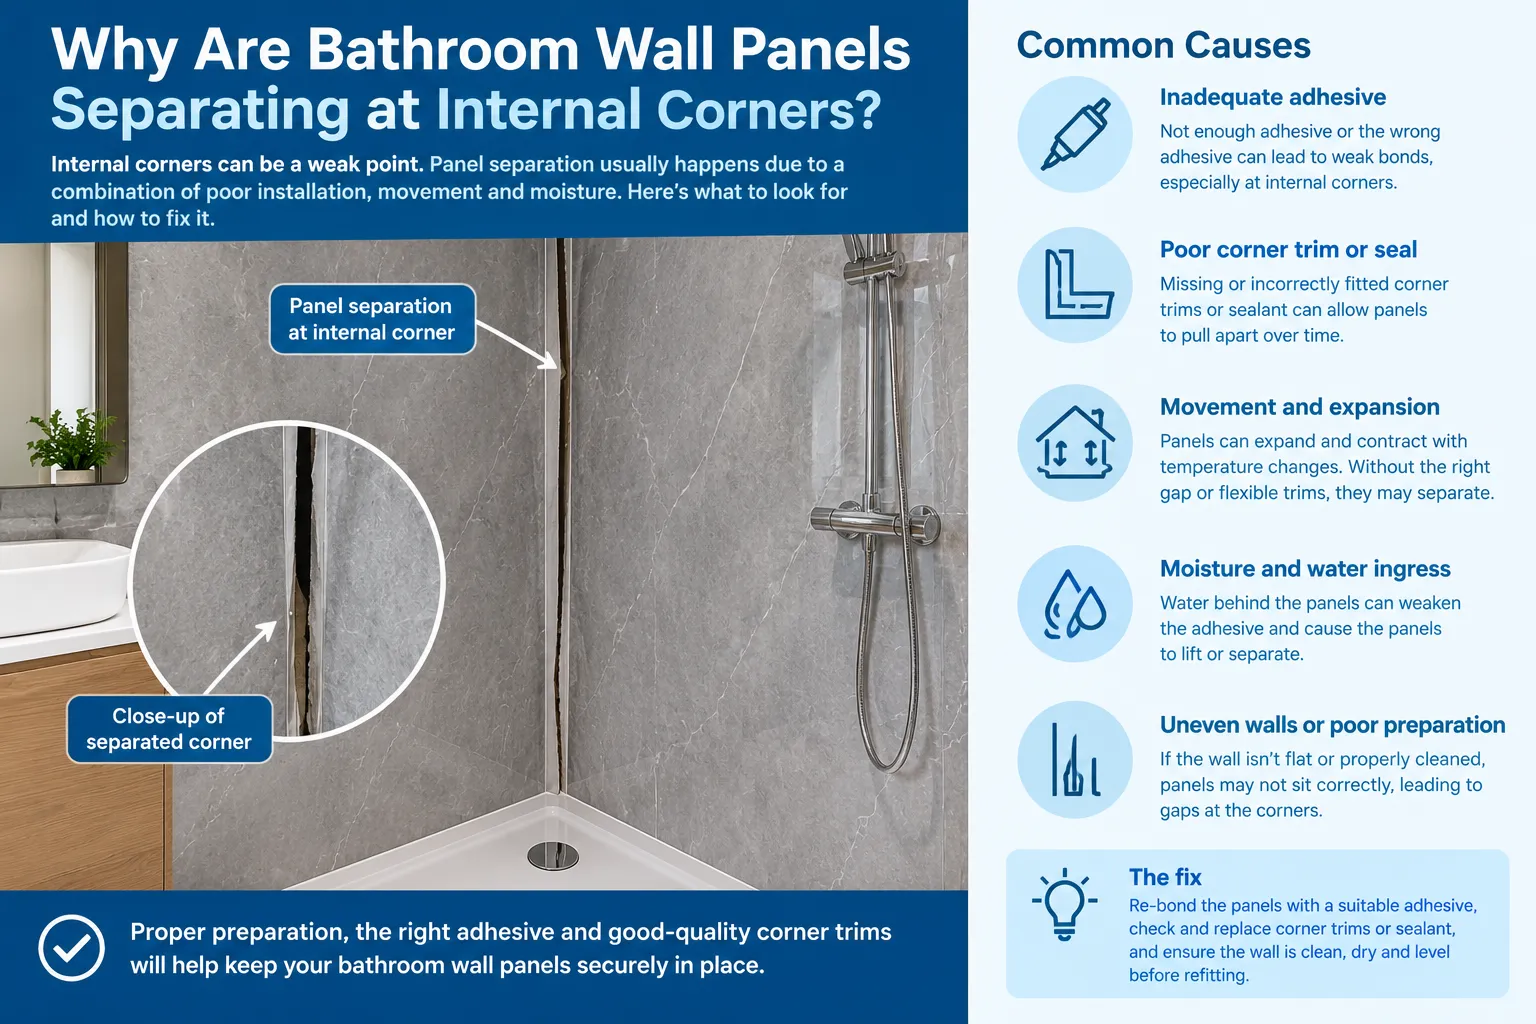

A gap opening up where two panels meet in an internal corner is one of the more common faults in a panelled bathroom, and one of the more worrying. It usually starts as a hairline crack in the sealant, then widens to a visible split, and before long water is reaching the wall behind. The cause is rarely a single dramatic failure. More often it is a combination of movement, preparation and sealant choice that has been building quietly since the day of installation.
This guide explains why internal corners are the first place panels give way, how to work out which cause applies to your bathroom, and how to repair the corner properly so it does not open again.
Why internal corners are the weak point
An internal corner is where two walls meet at roughly 90 degrees, and it is a natural stress point. Walls expand and contract slightly with temperature and humidity, but they do not do so by the same amount or at the same time. The two panels, the adhesive and the wall behind each respond differently, and the corner is where those small differences accumulate.
Corners also tend to be the least perfect part of a room. Plaster is thicker in the angle, walls may meet at slightly more or less than 90 degrees, and decorators often leave a bead of old sealant or filler there. A rigid panel pushed into an imperfect corner has very little room to move, and the first thing to give is usually the joint.
Finally, corners collect water. In a shower enclosure, spray runs down both walls and meets in the angle, so the joint takes more water than a flat section of panel does.
Common causes of corner separation
Most cases come down to one or more of the following.
No allowance for movement
Panels need a small gap at the edges so they can move independently of the structure. If two panels were butted tightly together in the corner, or pushed hard against the adjoining wall, there is nowhere for the movement to go. The panel flexes, the bond weakens and the joint opens. The gap size depends on the product, so the manufacturer's instructions are the right reference rather than a general figure.
The wrong sealant, or sealant used in the wrong place
Rigid fillers, decorators' caulk and general-purpose acrylic sealants do not flex enough for a bathroom corner. They crack as soon as the panels move. A neutral-cure sanitary silicone stays flexible and is designed for wet areas, but even that fails if it is applied to a dirty, damp or greasy surface. A bead that has never bonded properly will peel away from one side of the joint first.
Walls that were not flat or square
If the wall behind one panel was bowed or the corner was out of true, the panels will have been pulled into position during fitting. Over time, the tension tries to release itself, and the corner opens. This is particularly common on old plaster, on walls that have been patched, and on timber stud walls where the framing has shifted slightly.
Poor adhesion
If the adhesive did not grip properly, the panel can lift at its edge and pull away from the corner. Causes include dusty or glossy surfaces, adhesive applied sparingly or left to skin over, and panels not held in place while the adhesive set. Because the corner is the end of one panel and the start of another, it often shows the failure first.
Ongoing damp or condensation
Moisture that gets behind a panel softens plaster and weakens the bond. A corner that has been leaking for some time may show staining, a musty smell, or a spongy feel when pressed. Poor ventilation adds to this, since a bathroom that stays humid keeps the walls damp and the sealant wet.
Building movement
Houses move slightly, particularly newer builds still drying out and older properties on shifting ground. A crack that appears in the same corner as a crack in the ceiling or a nearby wall may be a symptom of structural movement, and no amount of resealing will cure it. This is uncommon, but worth considering if the gap keeps returning.
Diagnosing what is going on
Before repairing anything, spend a few minutes working out the cause, because repeating the same repair over the same fault will give the same result.
- Look at the gap. A narrow, even crack in the sealant suggests normal movement or poor adhesion. A wide, tapering gap suggests one panel has pulled away or the wall is bowed.
- Press the panels. If a panel flexes or sounds hollow near the corner, the adhesive has failed.
- Check for moisture. Look for staining, mould, swelling or softness behind the joint. If you have a damp meter, test the wall beside the corner and compare it with a dry area.
- Check ventilation. Is there an extractor fan, and does it actually run during and after a shower?
- Look at the sealant. Is it peeling cleanly from one side, which suggests it never bonded, or is it splitting through the middle, which suggests the joint is moving more than the sealant can cope with?
If you find signs of damp or a leak, deal with that first. A sealed-in leak will bring the corner apart again.
Repairing a separated corner
For a corner where the panels are still firmly bonded and there is no damp, the repair is usually straightforward.
- Remove the old sealant. Cut it out with a sharp knife or a sealant removal tool, taking care not to scratch the panel surface. Pull out any loose pieces.
- Clean and dry the joint. Wipe the edges with a suitable cleaner or isopropyl alcohol, then let them dry completely. Silicone will not bond to a damp or soapy surface.
- Check the gap. If the panels are butted tightly, trim a millimetre or two from the edge so there is room for the sealant to flex. If the gap is too wide for silicone alone, fit a corner trim.
- Mask the edges. Apply masking tape on either side of the joint to keep the line neat.
- Apply new sealant. Use a neutral-cure sanitary silicone, tool it smooth and remove the tape before it skins over.
- Allow full curing. Leave the shower unused for the period stated on the cartridge.
If the panel has lifted from the wall, you will need to re-bond it, which involves removing old adhesive and applying a suitable replacement, then holding the panel in place until it grips. Panels that have warped, cracked or absorbed moisture may need replacing.
For a comparison of panel thicknesses, trims and fixing methods, the range at Floors To Walls Shower Panel lists product details that help when you are deciding whether a trim or a replacement panel is the sounder repair.
Choosing a more durable corner finish
If a corner has separated once, it is worth considering a different finish when you repair it.
- A corner trim covers the joint with a rigid or flexible profile, which hides small gaps and takes some of the movement. It is more forgiving than silicone alone and gives the corner some protection from knocks.
- A sealed butt joint relies on a clean cut and a neat bead of silicone. It looks tidy, but it is only as good as the preparation and the gap you leave.
- A bonded and sealed return, where one panel is cut to wrap the corner, can look seamless, but it needs accurate cutting and a very flat wall.
For most bathrooms, a trim with a bead of silicone on each side is the more reliable choice, particularly in a shower, where the corner takes the most water.
Preventing it happening again
Prevention comes down to the points that went wrong the first time.
- Check the wall is flat and sound before fixing panels, and correct bowing or loose plaster first.
- Leave the expansion gap the manufacturer specifies, and do not force panels into the corner.
- Use neutral-cure sanitary silicone on clean, dry surfaces, and give it time to cure.
- Run an extractor fan during showers and for a while afterwards, to keep humidity down.
- Inspect the corners every few months, and renew the sealant at the first sign of cracking or peeling.
If you are reviewing the wider room as part of the repair, the ideas in this guide to Bathroom Renovation Ideas can help you decide whether it is worth tackling ventilation or the wall surface at the same time.
When to ask for help
A corner that keeps reopening, shows signs of damp behind the panel, or sits beside a visible crack in the building is worth a closer look from a qualified trades person. A supplier such as Floors To Walls can also advise on trims, panel thickness and fixing methods if you describe the problem, and a sample lets you test a corner finish before committing to the full repair.
A practical takeaway
Corner separation is almost always a sign that the joint had no room to move, the sealant was not suited to the job, or moisture was already at work behind the panel. Find the cause before you reseal: check for damp, test the panels for loose bonding and look at how the gap was left. Then cut out the old sealant, clean and dry the joint, leave a proper gap, fit a trim where it helps and use a neutral-cure sanitary silicone with its full curing time. A repair done in that order tends to last, and one that skips the diagnosis tends to come back.

















Sign in to leave a comment.