Focaccia bread is an Italian pastry that’s thick, fluffy and easy to make! This bread can be enjoyed savoury or sweet but it’s typically treated as a savoury pastry where people pair it with a variety of ingredients–the most common way to enjoy focaccia bread is with a side of olive oil with vinaigrette.
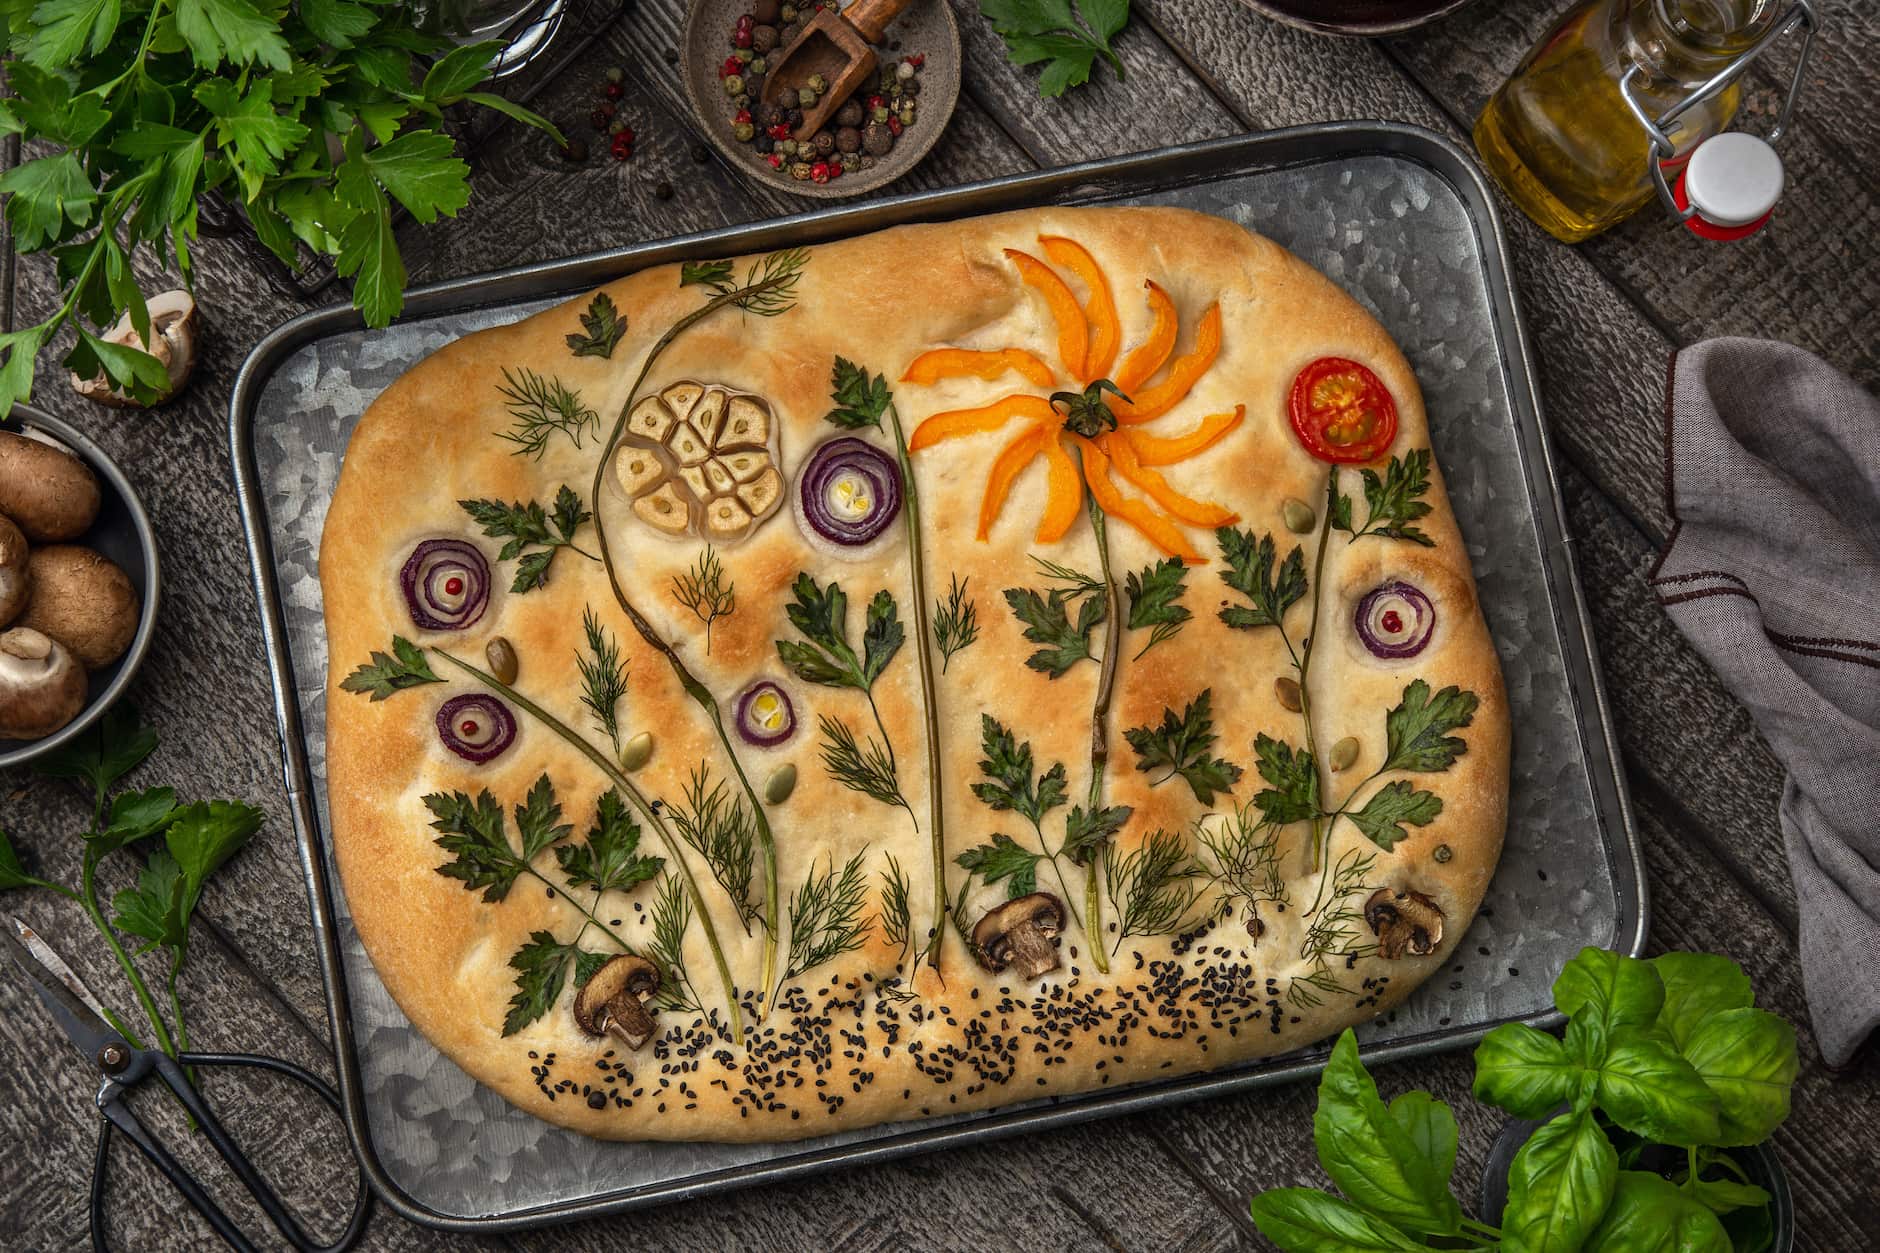
But as mentioned this bread is paired with many variety of ingredients like vegetables, herbs spices and so on. Because this bread is so versatile, it can also be decorated! Yes, you heard that right, you can decorate focaccia bread!
So if you’re a starting baker who wants to impress friends and family quickly and easily, then keep reading! Below is a scrumptious recipe that’ll guide you on how to make focaccia bread art!
Picking out a design
Let your imagination run wild with this recipe! You can create picturesque portraits of any image you have in mind, whether a scene of a garden, mountain and many more. And all you need to create the images are veggies, grains, meats, herbs and spices! Plus not only is this recipe beginner-friendly, it will have you whipping out a beautiful masterpiece out of the oven every time!
For inspiration, you can check Pinterest or even Instagram to get ideas on what you’d like to create! So without further ado, let’s get started!
What are the ingredients needed to make focaccia art?
- 2 ½ teaspoon of active dry yeast
- ¼ cup of olive oil
- 1 tablespoon of granulated sugar
- 2 cups of warm water (around 110ºF)
- 1 tablespoon of flakey salt
- 1 teaspoon of salt
- 5 cups of bread flour or all-purpose flour
- 1 tablespoons of fresh rosemary (chopped)
- Your choice of vegetables and toppings to use for decorating
- ½ cup of olive oil (To oil up the pan and drizzle on the focaccia after leaving it to rise)
How to make focaccia bread art?
Step 1: Mix the yeast and sugar with your first cup of heated water. Leave it alone for approximately five minutes, or until frothy. Then prepare your yeast mixture for your stand mixer by placing it in the mixer’s bowl and attaching the mixing hook. If you do not have a stand mixture, you can mix it with your hands.
Step 2: Then add around 1 cup of flour into the mixer and set it on low. Stop until well incorporated. Next, add in the remaining cup of water along with the olive oil, salt and half of your remaining flour–again, mix on low until all ingredients are fully combined.
Step 3: Once the dough starts to come away from the edges of the bowl, keep adding flour while mixing on low. Add a few more tablespoons of flour if it's still too sticky until it comes together. And if the dough comes out soft, know that’s normal.
Step 4: Continue mixing on low speed until the dough develops enough gluten to spring back when you touch it. After removing the dough from the bowl, knead it for two more minutes on the countertop, or until the dough bounces back.
Step 5: Put the dough in a bowl and add one tablespoon or so of olive oil to it. Once it has doubled in size, cover it with plastic wrap and let rise in a warm area for one to two hours. Using active dry yeast will result in a longer proofing time before it doubles.
Step 6: A 12″ by 17″ sheet pan, or any pan of a comparable size, should be filled with enough olive oil to coat the whole bottom of the pan with a thin layer of oil. To avoid sticking, coat your hands with olive oil before removing the focaccia dough from the bowl.
Split in half, if desired. After placing it in the pan, start stretching it. If it shrinks back, give the gluten a chance to relax for around fifteen minutes before attempting to stretch it once more. If you divide it in half, don't bother about getting it to the edges.
Step 7: When you're done stretching it, wrap it in plastic wrap and refrigerate it for the whole night to allow the flavour to develop. Take your bread dough out of the refrigerator and let it rest a good 30 minutes before baking. Using your oiled-up fingertips, make little indentations or in other terms “dimples” on the surface so that the olive oil may gather there.
Step 8: Spread a generous layer of extra virgin olive oil over the bread until it dribbles into each dimple. Season with flaky salt. Once the focaccia has risen for half an hour, top it with any combination of meats, vegetables, and herbs you’d like. This is when the fun part steps in!
After decorating your focaccia, brush your creation with more olive oil to prevent it from burning because the next step is to bake it!
Step 9: Set your oven around 450ºF and place in your focaccia. Leave it to bake for about 20 to 25 minutes OR until your focaccia starts to show off a golden sheen.
Step 10: If you’ve topped your focaccia with veggies, it’s best to consume it within the day. And if you happen to have leftovers, you can refrigerate them. And for re-heating, a good 5 to 10 minutes in the oven at 350ºF will do.


