DigitalOcean is one of the fastest growing cloud hosting companies in the globe that focuses on simplicity and scale. Today we’re going to learn how to host a website on Digitalocean.
Why We Love DigitalOcean
Opening its doors in 2011, it soon became one of the largest cloud hosting providers with over a million users. DigitalOcean servers are known as Droplets — the smallest unit of a cloud server that you can buy starting at $5/month.
The key factor to DigitalOcean’s stupendous success is its simplicity. In addition to being a clean and simple option, there is lots more to love DigitalOcean for your WordPress site. Here are five reasons why we find DigitalOcean to be awesome.
Note: This is an optional section, you can skip it and jump right into the next section to install WordPress in DigitalOcean. Check out Cloudways web hosting support.
Competitive, Affordable Pricing
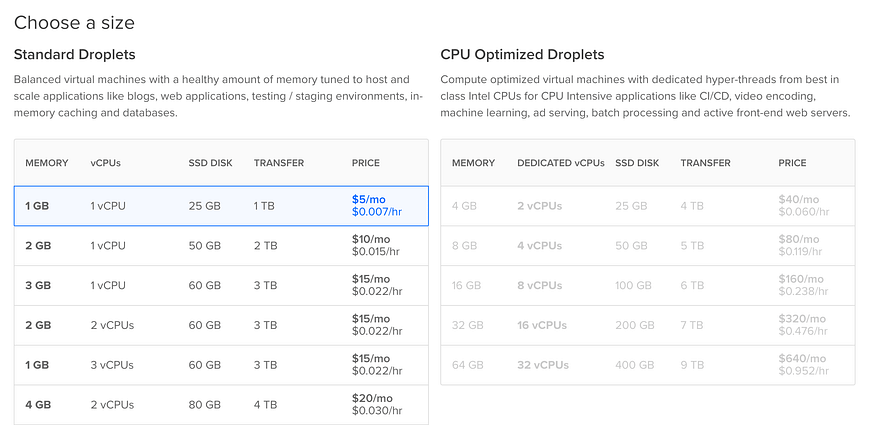
DigitalOcean Pricing (September 2018)
DigitalOcean has one of the lowest pricing points in the cloud hosting industry. You can get started with your own server for as little as $5/month.
Three characteristics make DigitalOcean highly affordable.
- Pay-per-hour usage
- No minimum period of renting
- No setup fee (even for large setups)
- Plans start at $0.0007/hour
DigitalOcean's droplets start as low as $5/month!
The $5/month droplet comes with:
- 1GB of RAM
- 25GB of SSD storage space (SSDs are about 10x faster than traditional hard disks)
- 1TB of bandwidth (that’s really generous)
- 1 unit of vCPU (virtual CPU) power
- Price: $0.007/hour which is roughly $60/year!
Automatic 1-Click Installer for WordPress

1-Click WordPress Install offered by DigitalOcean
DigitalOcean has a sweet ready-made image for WordPress and a plethora of other open-source software, which makes it an invaluable asset. With a few clicks (you’ll see how) we’ll be able to create steady working installation of WordPress in no time.
Epic Community and Knowledgebase
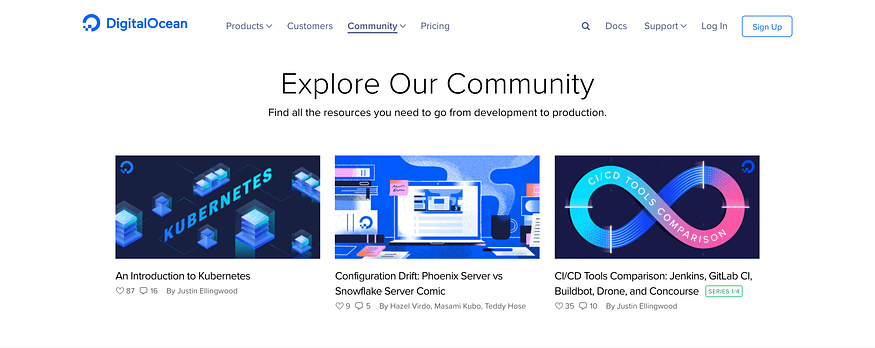
DigitalOcean’s community-focused approach to winning customers
DigitalOcean has a plethora of tutorials on virtually any OS, any software and any (hosting related) topic! The best part — it’s meticulously tested on their droplets in order to ensure it works on your droplet as well!
Apart from tutorials, you also have active Q&A forums and interesting community projects.
Dynamic Resizing
With DigitalOcean, you can dynamically resize your droplet. Remember we talked about it in Introduction to Cloud Computing with WordPress? Whenever you need some extra juice, resizing a droplet as easy as twisting a knob to increase the volume!
Trusted by the Best Developers
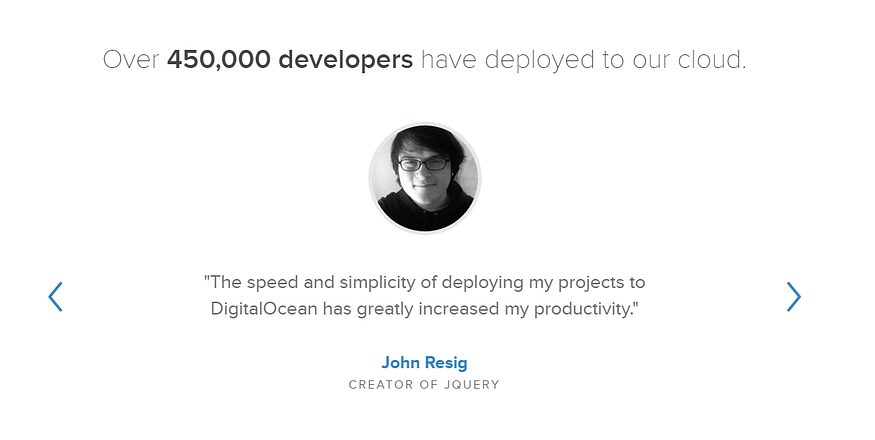
Developers love DigitalOcean
John Resig, creator of jQuery (one of the best JavaScript frameworks), Salvatore Sanfilippo, creator of Redis, and the co-founder of StackExchange, Jeff Atwood — all use DigitalOcean for their projects.
Installing WordPress on DigitalOcean
Prerequisite: Once you’ve signed up for DigitalOcean, you need update your contact information and transfer some money (around $5) to your DigitalOcean account to create your first droplet. Think of it as a prepaid phone. You can use PayPal or credit card to recharge your account. Now we are ready to create our WordPress droplet.
DigitalOcean User Account Organization: What are Projects?
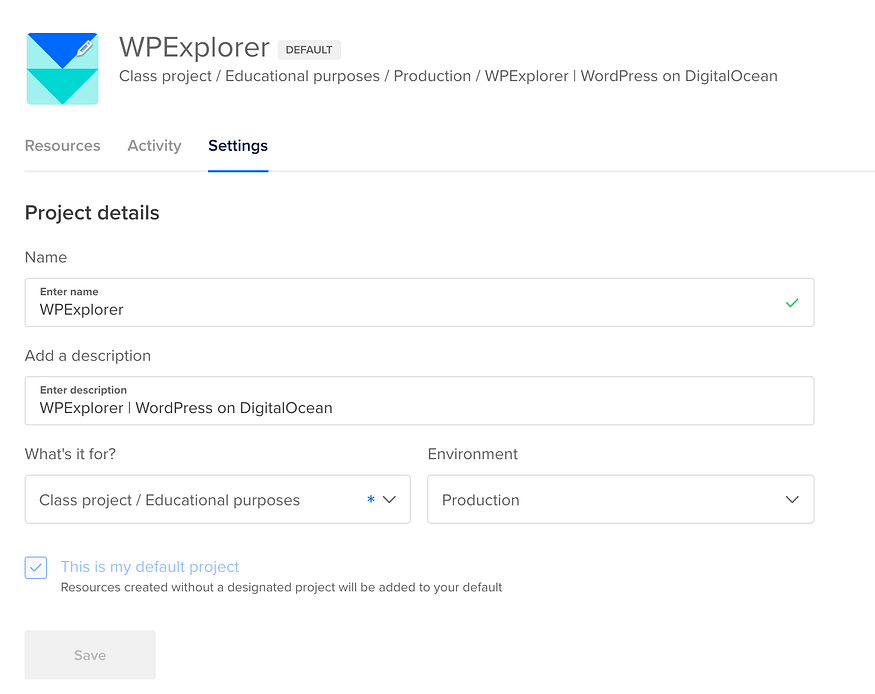
Projects are a basic unit of organization in your DigitalOcean account. Each project can have multiple droplets and other features (such as load balancers and object storage) that DigitalOcean has to offer. A single DigitalOcean account can have multiple projects.
We start by creating our first DigitalOcean project. Select a project name, description, project purpose and environment. An environment can be either Development, Staging or Production. For our tutorial, we’ve chosen the options as shown in the screenshot above.
Since DigitalOcean is a developer focused cloud hosting platform, they have these additional options that go a long way in helping developers organize their projects.
How to Create WordPress Droplet in DigitalOcean
Once you’ve created a project, you can now create a droplet.
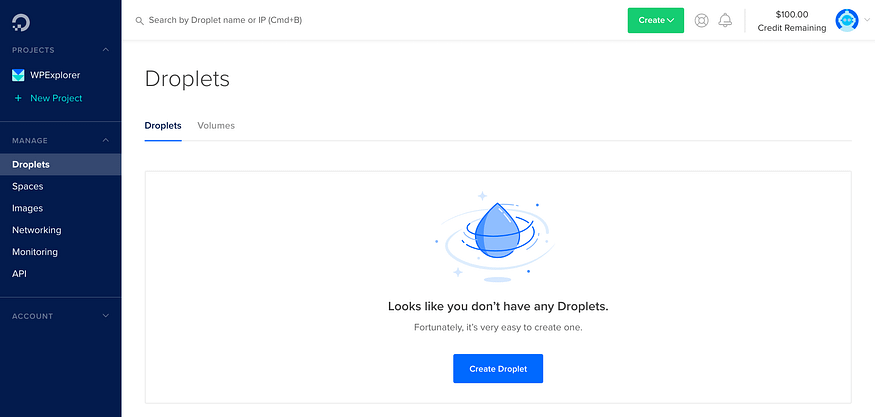
Step 1: We start off by creating a droplet inside the WPExplorer project.
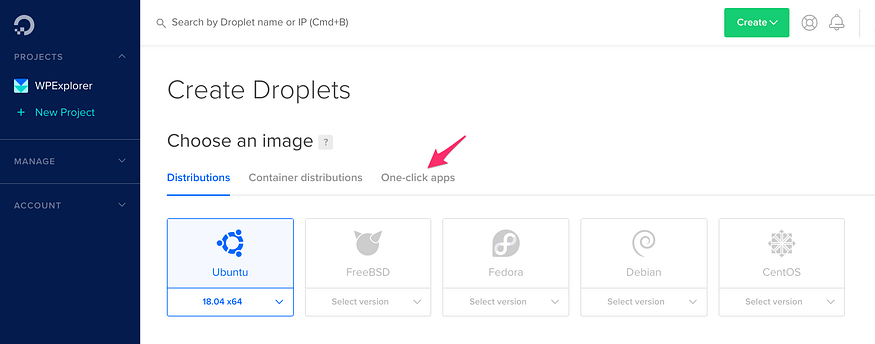
Step 2: Select Ubuntu as your droplet’s OS and then select the One-click apps tab.
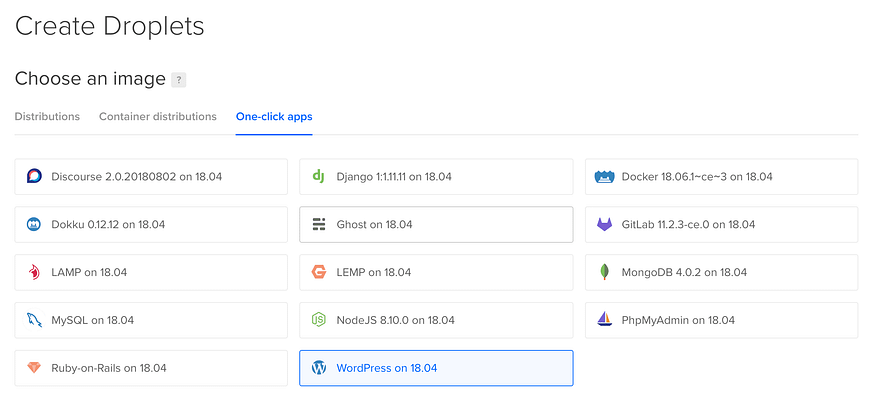
Step 3: Select WordPress on 18.04. This means that DigitalOcean is going to automatically install WordPress on Ubuntu 18.04.
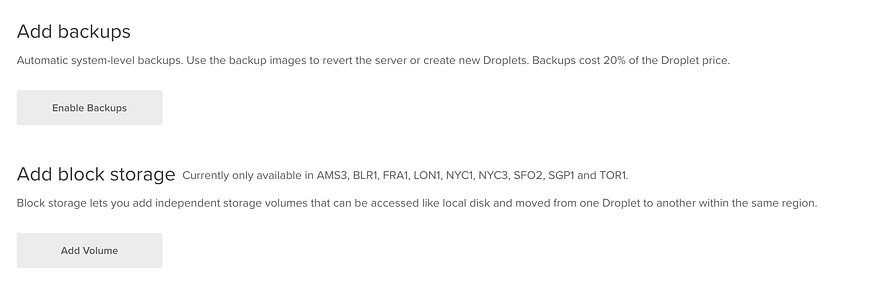
Note — You can additionally add backups to your Droplet. However, this is not important to us since this is a tutorial. Also, this should not be confused with WordPress backups. A droplet backup are automatic system-level backups, which mean they copy everything in the OS (and not just WordPress).
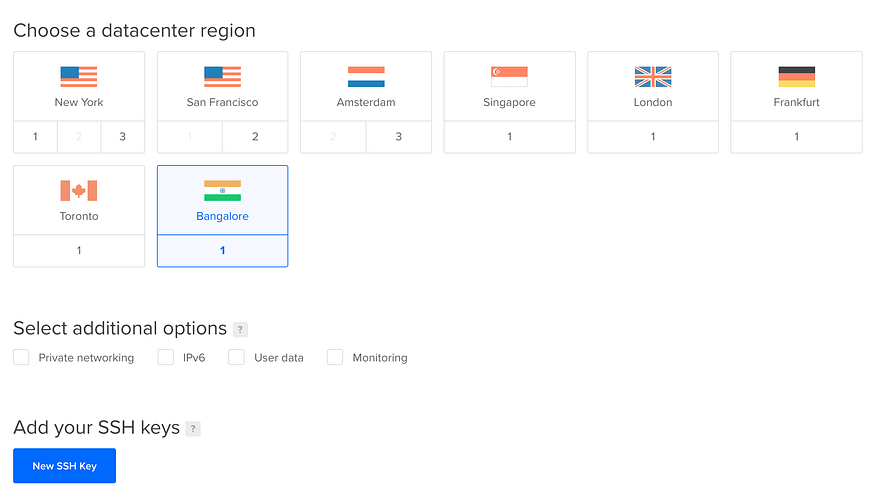
Step 4: DigitalOcean droplets can be deployed across 8 different datacenters. Since I’m located in India, I’ve selected Bangalore. It is optional to select the additional options (such as private network, IPv6, etc.) and an SSH key. Since we’re here to only install WordPress, these features won’t be necessary. However feel free to try them out in your DigitalOcean account!
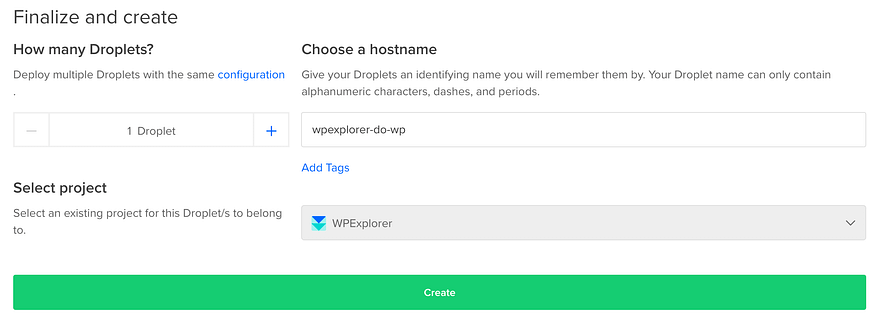
Step 5: As you can see, the default project, i.e. WPExplorer is automatically selected. Enter a hostname (this is for you to remember internally) and click on Create to start creating your droplet.
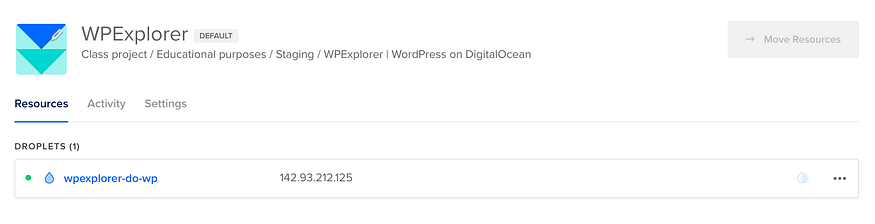
DigitalOcean droplet is ready!
Step 6: Once the droplet is created, you’ll see message similar to the screenshot above.
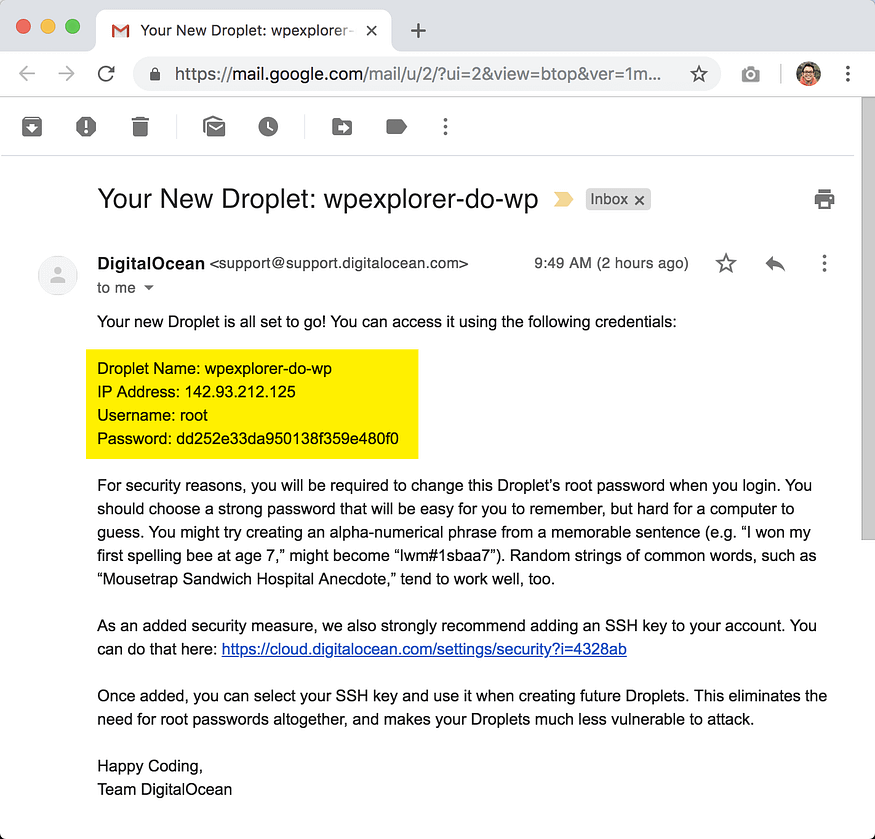
You should also receive a similar email in your registered DigitalOcean email account.
Logging into DigitalOcean droplet via SSH Console
It’s almost time for the famous 5 minute WordPress install. Only this time we’re going to be done within 2 minutes. We already have the IP address that we can use to login to the WordPress server. However, we need to login to our DigitalOcean droplet via SSH for a first-time configuration.
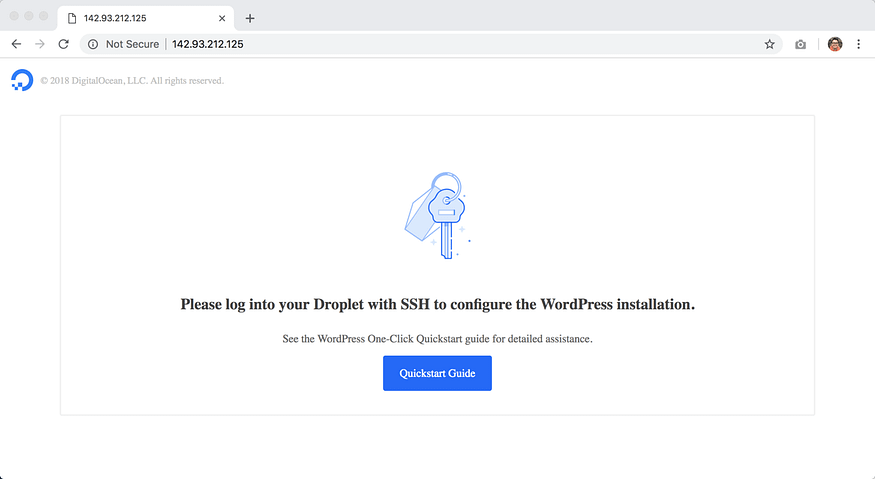
Unless we do that, we’re going to see a message like this when we enter the IP address in our browser. You can login to your DigitalOcean droplet via SSH using Putty in Windows or Terminal in Mac. However, DigitalOcean has an even simpler way to do this, as shown below:
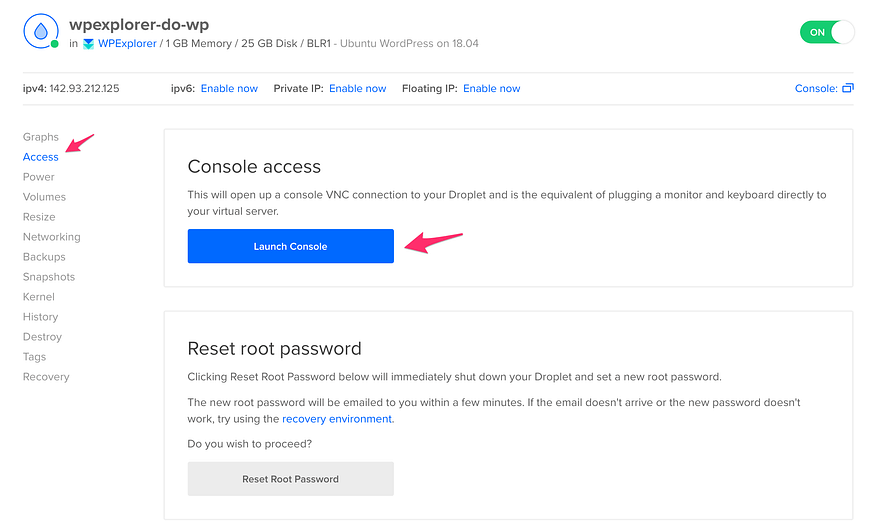
First, from you DigitalOcean dashboard, select your droplet, and then select the Access tab from the left menu. Click on Launch Console to access your droplet via SSH using your web browser.
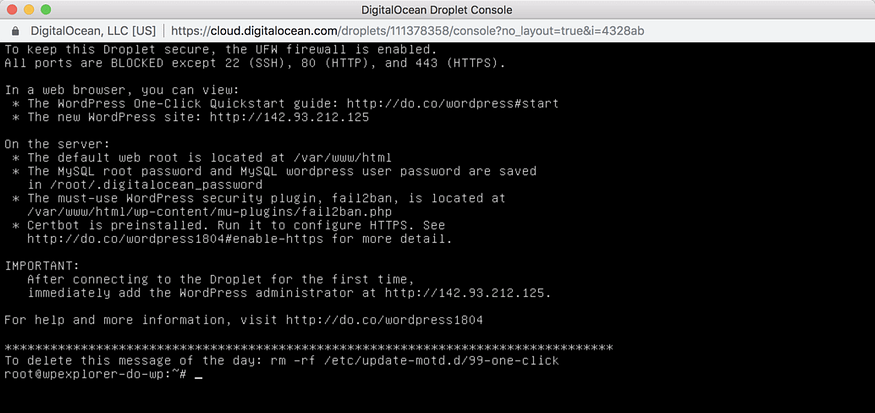
Next, enter your username (root) and password that was emailed to you earlier. You’ll be immediately asked to create a new password for the root user account. Once you’ve reset the root password, you should see a message similar to the one above.
That’s it. We’re now ready for the famous 2-minute WordPress install!
Configuring WordPress installation on DigitalOcean
So far we’ve:
- Created a new DigitalOcean droplet with Ubuntu and WordPress pre-installed; and
- Logged into the droplet via SSH (using DigitalOcean’s built-in console access).
Now we need to do the final steps to get our WordPress site ready.
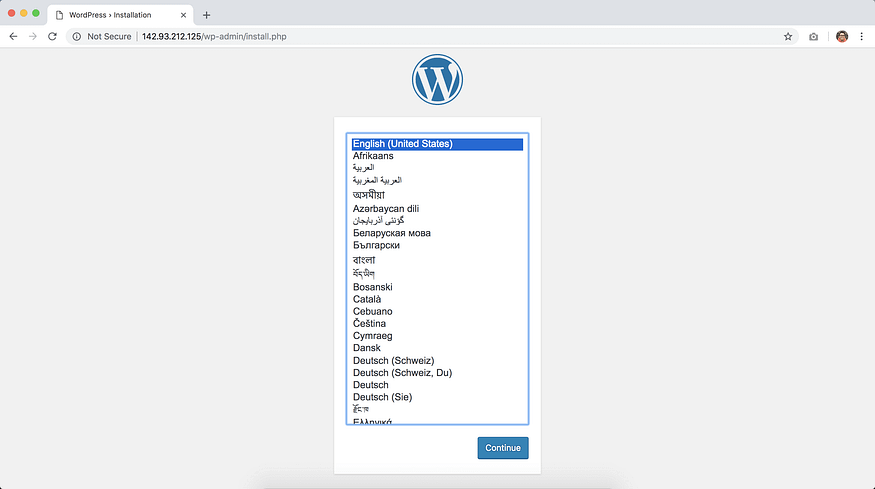
Enter the IP address in your browser, and you should be greeted with the famous install screen.
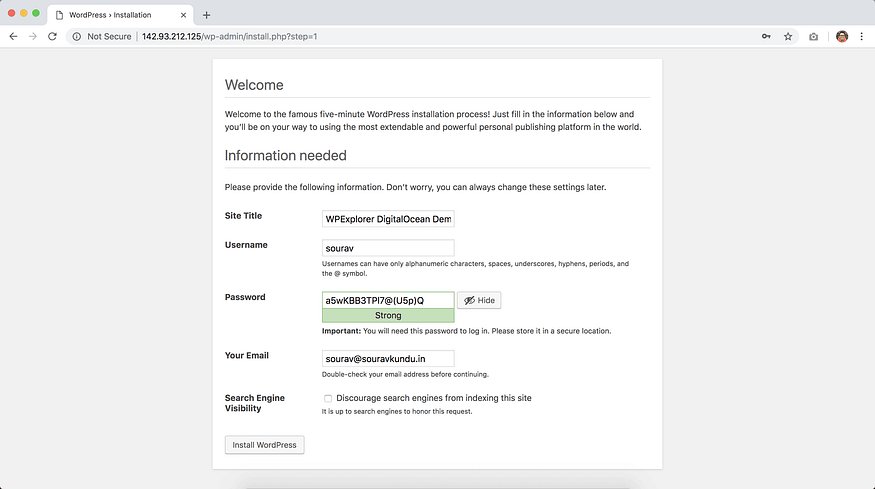
Now select a username, password and email address. The database configuration has been pre-configured by DigitalOcean. You might also want to turn off search engine visibility, if you’re testing a site. Only thing is, you should enable it once your site is ready.
Click on Install WordPress and let the magic happen.
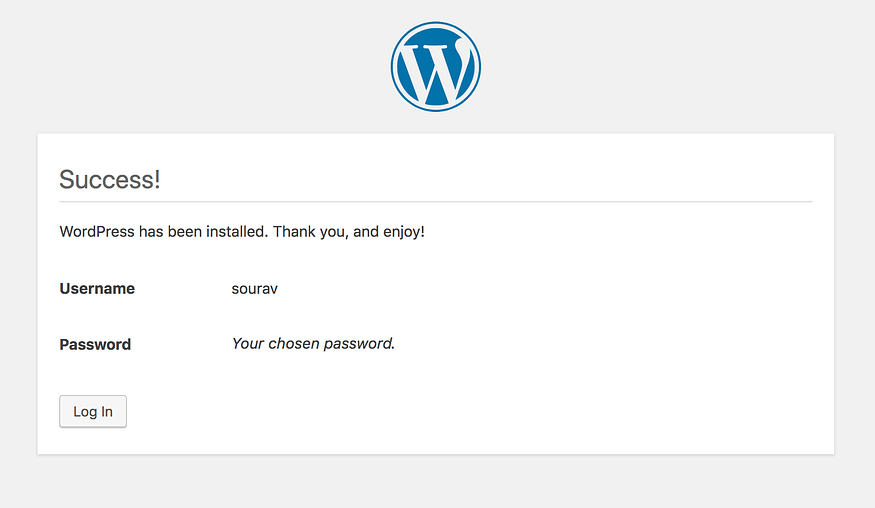
And there you have it — WordPress is ready.
This marks the end of our basic tutorial.
Bonus: DigitalOcean For Beginners (Another Cloud Option)
Remember when we did our Cloudways hosting review a while back? Well one of the cool features that Cloudways offers is the option to choose your cloud, and one of the choices is DigitalOcean! Since Cloudways does all the heavy lifting for you, you can just point click and get started hosting your website so you can had all the awesome benefits of cloud hosting with DigitalOcean minus the setup. This makes Cloudways a great option for newbies or for people who don’t want to dig into the technical aspect of setting up cloud hosting.
Advanced WordPress configuration in DigitalOcean
Having a WordPress site in DigitalOcean is great. However, it won’t do much good if your WordPress site’s URL is an IP address. We need to link it to a domain name. Also, encrypted websites are the norm today, so we’re going to learn how to install an HTTPS certificate in our WordPress droplet.
Here’s a round-up of what we’ll be covering in our advanced WordPress configuration section:
- Configure a domain name to your WordPress site
- Install HTTPS for WordPress in your DigitalOcean droplet.
Configuring a domain name to your DigitalOcean WordPress droplet
In order to configure your WordPress URL, you need to:
- Add an “A record” pointing to your droplet’s IP address and
- Change the site URL from the WordPress admin dashboard.
It’s a two part process that needs to be done sequentially.
Part 1: Adding an A record to your domain:
This part mostly depends on your hosting provider. You should refer your hosts documentation on adding A records to your DNS. Or simply Google “how to add a record in <your domain provider>” You should get specific instructions.
If your host comes with cPanel (most shared web hosts do), we’ve got a tutorial for you right here:
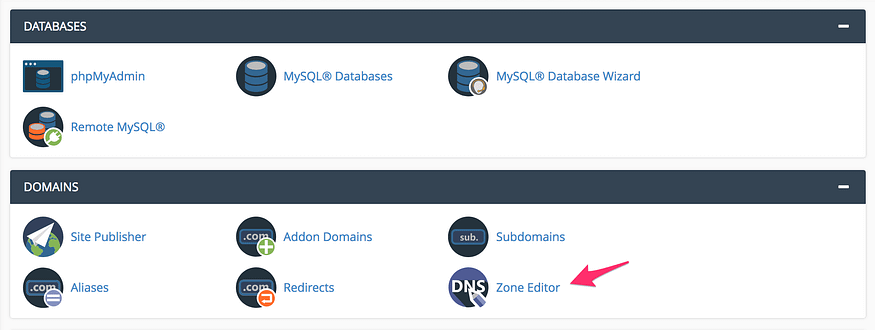
Step 1: Login to your cPanel account and select Zone Editor. You can also use the search function in cPanel to quickly locate this tool.
Step 2: Click on + A Record to add a new A record.
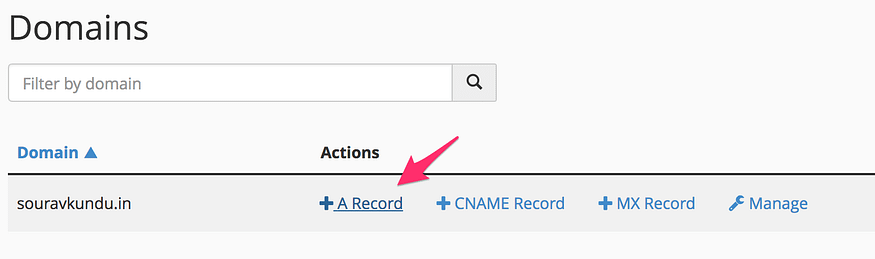
Step 3: Let’s assume your domain name is example.com and you want to point it to your new DigitalOcean droplet. In this case, you need to add two A records in your DNS Zone editor. The first one is for example.com and the other is for www.example.com. Both these records will point your primary domain name to the droplet’s IP address. You should use the following configuration:
A Record #1: ‘example.com’
Name: example.com. (yes a trailing '.' is included)
Address: In the address field, add you droplet's IP address.
A Record #2: ‘www.example.com’
Name: www.example.com. (a trailing '.' will automatically appear. If it does not, ignore it!)
Address: Your droplet's IP address.
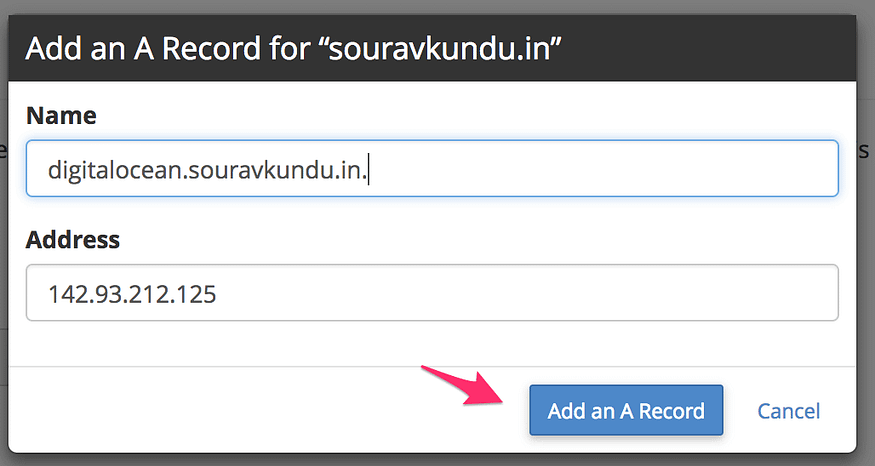
However, for our tutorial, we’re using a subdomain — digitalocean.souravkundu.in. Therefore we’ve entered a single A record for the subdomain to point to the droplet’s IP address.
Note — this setup is also useful for websites that have different subdomain for their blog. For instance “blog.productsite.com”.
A Record for our tutorial: ‘digitalocean.souravkundu.in’
Name: digitalocean.souravkundu.in.
Address: Our droplet's IP address
Once the A records are configured to point to the droplet’s IP address, it should take some time for it to reflect. (It does not happen instantaneously). This waiting period is called the DNS propagation time, and lasts up to 24 hours. However, practically speaking, it should not take more than 5 minutes if it’s a new A record.
Step 4: To verify that the A record is working, enter the URL (which in our case is digitalocean.souravkundu.in) in your browser, and you should see your WordPress site. That tells you that you’ve successfully linked your domain to your DigitalOcean droplet.
Part 2: Changing the WordPress Site URL in DigitalOcean

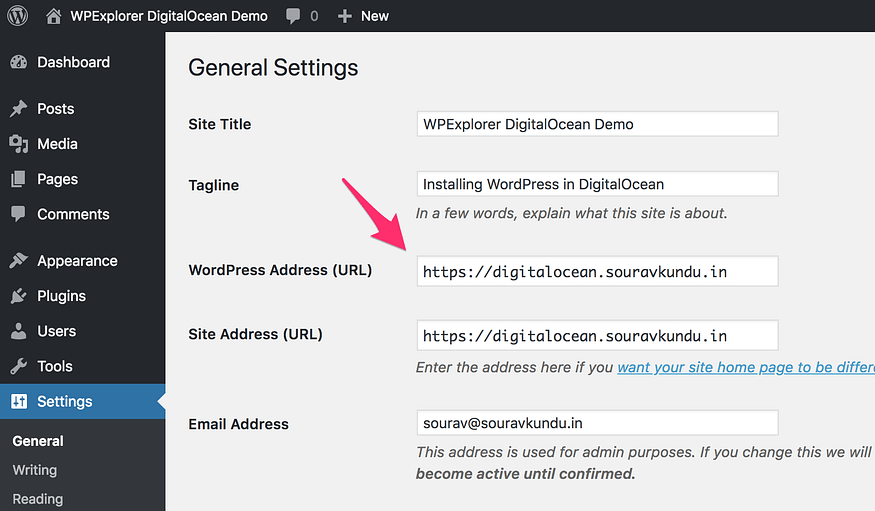
When we’ve installed the WordPress site in DigitalOcean, the site URL is automatically configured to be the server’s IP address. We now have to change it to the new domain name we just configured.
Head over to the WordPress dashboard → Settings → General. We have to change two fields here:
- WordPress Address (URL)
- Site Address (URL)
Change it to the respective URL you’ve set in the A record in the previous section. It should be either ‘example.com’ or ‘blog.example.com’. Note that both the WordPress Address and the Site Address need to have the same values.

In our tutorial, we’ve used http://digitalocean.souravkundu.in/. Once done scroll down and hit Save to save the changes.
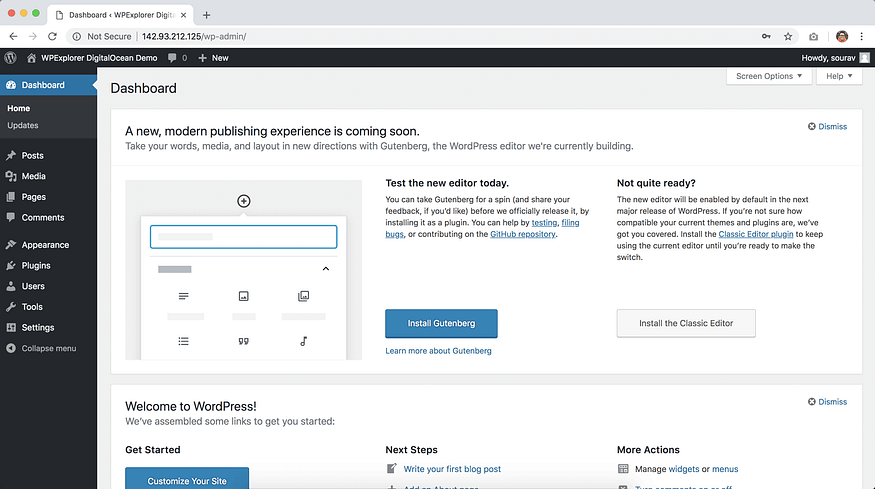
Your WordPress site is now ready!
Adding HTTPS to WordPress using DigitalOcean
Setting up an SSL certificate enables HTTPS on the web server, which secures the traffic between the server and the clients connecting to it. DigitalOcean pre-installs a tool called Certbot in the one-click WordPress install droplet. Certbot is a free and convenient way to set up SSL certificates on a server.
We’ll now look at how to configure Certbot in DigitalOcean to add HTTPS to your WordPress site.
According to DigitalOcean’s documentation, to use Certbot, you’ll need a registered domain name and two DNS records:
- An A record from the domain (e.g., example.com) to the server’s IP address
- An A record from the domain prefaced with www (e.g., www.example.com) to the server’s IP address.
This is very similar to the part 1 of the DNS configuration section. And guess what? We’ve already done it!
Once this step is done, we’ll need to login to the droplet’s console via SSH and run the following command:
certbot --apache -d example.com -d www.example.com
Only thing is example.com is replaced with your domain name. In our tutorial, since we’re only using a subdomain, the command is going to be:
certbot --apache -d digitalocean.souravkundu.in
- There are going to be a couple of prompts when the command is running. Simply agree to them by entering ‘Y’ on the console.
- You’ll also be asked if you want to redirect all HTTP traffic to the HTTPS version of the website. I would recommend selecting yes, since this ensures that all your visitors get the encrypted version of your website.
- Once done, you’ll have to go back to the WordPress dashboard and change the site URL from http to https, as shown in the screenshot below.
Automating and Scheduling DigitalOcean Backups
As mentioned before you can add backups to your DigitalOcean droplet, but these are only offered once a week. A lot can happen in 7 days between backups. This is why we think it’s beneficial to either take your own site backups or use a trusted service like SnapShooter to help you better manage them.
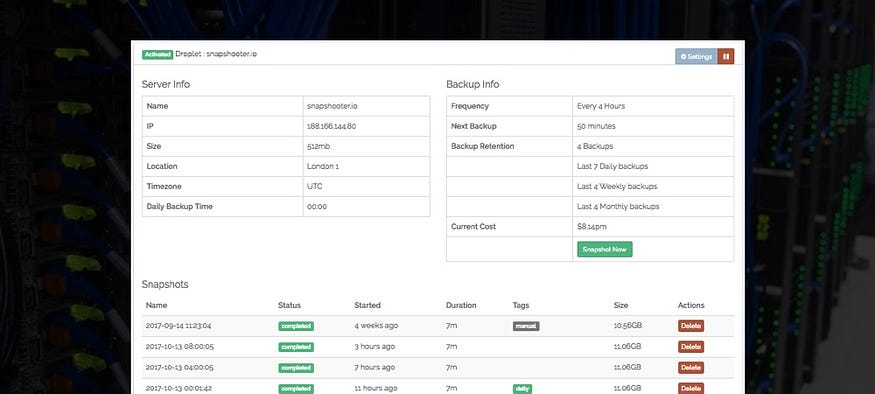
With SnapShooter you can schedule and create as many backups as you need. Whether that’s daily, hourly or on demand. Plus you can plan to take backups during non-peak times, maintain a complete archive (choose how many you want to keep), and store them securely. The option to connect multiple DigitalOcean accounts to SnapShooter allows you to streamline backups for all your sites. SnapShooter can even auto-detect and activate backups for all new droplets — keeping your sites covered.
Of course you can take manual backups of your site, but a service like SnapShooter makes the process easier.
Wrapping Up
DigitalOcean is one of the finest examples of developer-friendly cloud hosting providers out there. They have extensive documentation including a dedicated page for WordPress and ticket-based support system. Powered by intuitive design, user-centric guides and robust features, DigitalOcean is changing the face of cloud hosting — one droplet at a time. And with a $5/month entry point, it’s an excellent place to learn how to get your hands dirty with WordPress.


