G Suite is a prolific cloud application that caters to the needs of organizations of various sizes (small, medium). But for big enterprises, Office 365 is the more preferred choice. The advanced features of Microsoft 365 along with its ability to integrate with local desktop applications make it a popular cloud suite. And, so many organizations are moving towards it. However, if you are looking to go this route and migrate Google Workspace business to Office 365, you will need to follow these steps.
Instant Solution
Instead of consuming an alarming amount of time and effort with the manual method, try the automated SysTools Migrator Tool to migrate G Suite to Office 365.
It allows the administrator to migrate emails, contacts, calendars, docs, etc. from Google Workspace business to Office 365 accounts.
Step-1: Verify your Domain
First, you need to confirm with Office 365 that you own the domain of your G Suite accounts. However, if you are using an Office 365 subscription instead of using your own custom domain, you can add users after creating the users in Office 365.
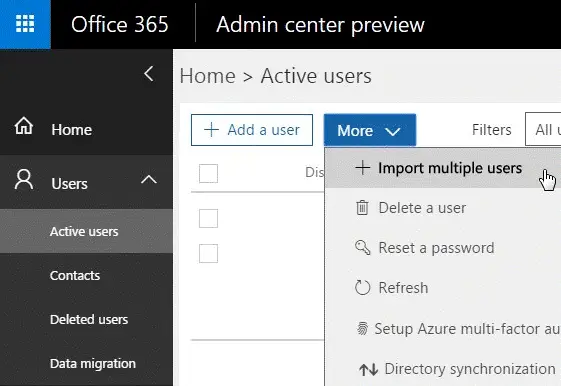
Step 2: Create the users and add them to Office 365
- Before creating a user, the relevant license is required. Each user should be assigned a mailbox to speed up the mail migration process.
- Now, go to the Admin Center, click “Users” -> select “Active Users” -> click “More” button -> select “Import multiple users” option.
- For “Single User Input“, click “Add User” on the previous screen and enter the value manually. Using “Import Multiple Users“, you can download a sample Excel sheet and use it as a reference for adding users.
- Some important fields in this CSV file include username, first name, last name, display name, age, mobile number, etc.
- The “Username” column must contain an e-mail address. For example, this would be abc@example.com
- After filling the Excel worksheet with the last name list, click “Browse” from the “Create and Upload File” screen. Next, click “Verify“. After receiving the confirmation, “The file looks good“, click “Next“.

Step 3: Create a list of G Suite mailboxes to migrate
First, write an Excel file containing a compiled list of Gmail mailboxes to migrate to Office 365. When creating the migration file, you must have the knowledge of the password of each G Suite mailbox to migrate. You can assign a temporary password to the mailbox during the migration process. You must be a G Suite administrator to reset your password. Mailboxes can be migrated in batches based on the convenience of users.
- Log in to the G Suite admin console using the administrator's username and password.
- Select Users.
- Go to the Google Admin center and select “User List“.
- Select each G Suite user to identify each user's email address, and write it down (the mail address).
- Go to “Users“> “Active Users” in the Office 365 admin center.
- Start Excel. Enter the credentials of each mailbox to be migrated, such as e-mail address, username, and password. Enter one mailbox per line.

- Save it as a CSV file.
Step 4: Use G Suite IMAP to create a migration endpoint
To successfully migrate Google Workspace business to Office 365, a streamlined communication channel was established using Gmail. For this, Microsoft 365 uses a migration endpoint. Migration endpoint is a term that includes settings for establishing a connection for smooth mailbox migration. The steps below can help you create a migration endpoint
- Open the Exchange Admin Center.
- In the Exchange Management Center, go to “Recipients“> “Migration” and click “…“> “Migrate endpoints“.

- Click New +.
- On the new page, select IMAP.
- In the “IMAP migration configuration” page, enter the details: IMAP server: imap.gmail.com and keep the setting: default
- Click Next. The migration service uses these settings to establish a connection with the G Suite system. A normal connection results in opening the “General Login Information Page“.
- Enter the name of the migration endpoint on the “Enter general information” page, for example Testcase-endpoint.
- Leave the other two boxes blank. Click on New.
Step 5: Migrate mailboxes by creating a migration batch
To migrate from Google Workspace business to Office 365, a migration batch will be created with Gmail mailboxes.
- In MS Office 365, open “Admin Center” -> select “Exchange“.

- In the Exchange Admin Center, go to “Recipients“> “Migration“.
- Click New (+) -> select “Migrate to Exchange Online“.

- Select “IMAP Migration“> “Next“.
- In the “Select User” screen, click “Browse” and select the previously created CSV file to migrate. Click “Next”.
- After verification, Office 365 will display your G Suite inbox. Click Next.
- On the Set Migration Endpoint screen, select the migration endpoint (the endpoint created in the previous step), then click Next.
- In the “IMAP Migration Configuration” window, continue to use the default values and click “Next“.
- In the box on the “Mobile Configuration” page, type the name of the migration batch (without spaces or special characters), for example, Test1234-migration. Also, provide the name of the folder to exclude. Click the add (+) icon to add it to the exclusion list.
- Enter the required options in the “Start Batch” page and start the migration.
Step 6: Update DNS records to migrate directly to Office 365
Email systems use DNS records called MX records to find the exact address used for mail delivery. During the mail migration process, your MX records point to your Gmail system. Now it's time to point the MX record to Office365. After editing the MX record, the email sent to your Gmail account will be delivered to your Office 365 mailbox.
- To do this, from “Admin Center“> click “Settings” in the left panel
- Select the domain name after clicking on “Domain“. Usually “Setting in progress” is displayed.
- Notification “Installation completed” will appear.

For example, if your domain name is abc.com
abc.com (default) is running
abc.onmicrosoft.com – installation completed successfully
Click the default site abc.com; the “Configure your online service” screen will appear with the following two options:
- Add records for me: This option will connect to your DNS domain (eg GoDaddy) and automatically update the MX records.
- I will manage my DNS records: This option allows you to flexibly enter a list of DNS entries (MX record values) that follows the process of manually adding the domain registrar.
Click on the second option, now you need to add MX records to DNS. For each domain, the MX record value will be different.
Migrate Google Workspace Business to Office 365
If you plan to migrate mail from a G Suite account to an Office 365 account, you may need a third-party tool or utility (such as PCVITA Google Apps to Office 365). The G Suite to Office 365 software has the following features:
- Migrate all the users’ mailboxes without loss of data
- It provides delta migration to skip already migrated data and avoid data redundancy.
- Throughout the entire migration process, it can ensure complete accuracy and security of the entire data set.
- Comes date range filters and item-type filters (emails, contacts, calendars, documents).
- Offers priority to specific user mailboxes.
- Generate migration reports.


