Basements fail quietly: a bit of musty air, a faint tide mark after heavy rain, paint that bubbles months after a “freshen up,” and storage that never quite feels safe.
If you’re weighing a remodel, a fit-out, or a commercial-grade upgrade, treating the wall as a system (not a surface) is the difference between “looks good on day one” and “still behaves in year five.”
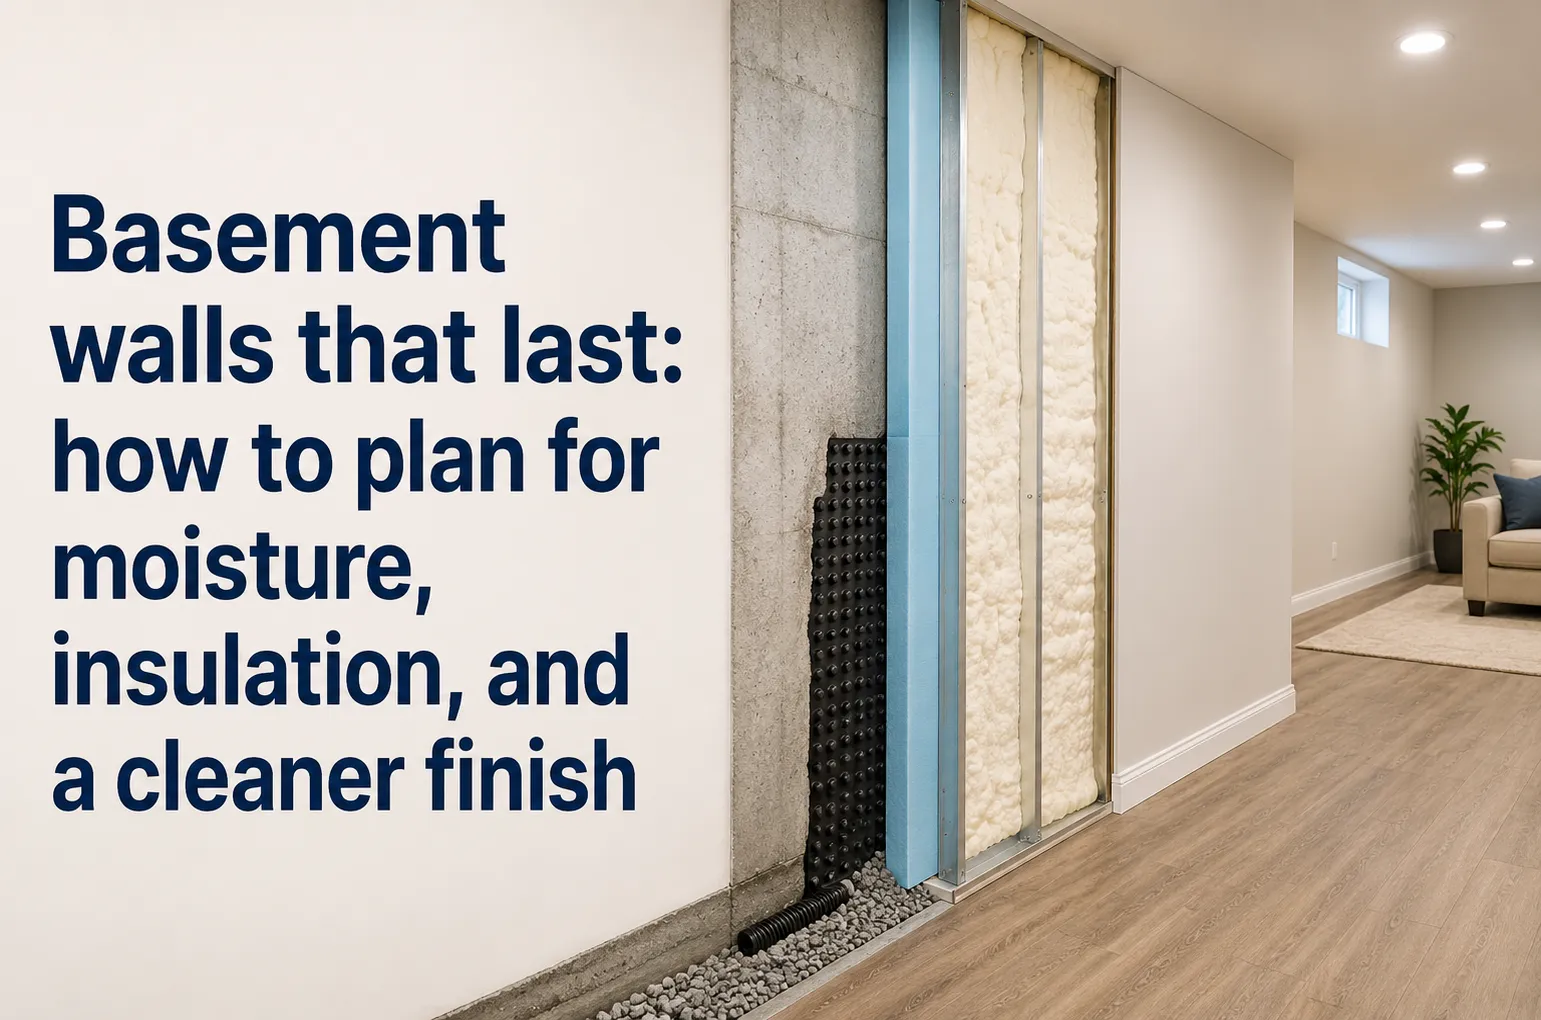
A smart basement wall system mindset starts with controlling moisture and condensation first, then choosing materials and sequencing that won’t trap problems behind a finished face.
Why basement walls fail early
Basement walls sit at the intersection of ground moisture, temperature swings, and indoor humidity, so small planning errors compound quickly.
Most failures come from one of three patterns: water entering (bulk moisture), water forming (condensation), or water being trapped (poor drying paths).
A durable finish is less about the final material and more about how the wall assembly manages air movement, vapour movement, and drainage pathways.
The decision factors that matter most
1) What kind of moisture are you dealing with?
Bulk water (leaks, seepage, hydrostatic pressure) needs drainage and waterproofing solutions upstream of any internal wall works. Condensation (warm air meeting cold surfaces) is often a ventilation, insulation, and air-sealing conversation.
2) How will the wall dry if it gets wet?
Every basement should be treated as “might get damp at some point.” Choose assemblies that can dry to at least one side and avoid creating a sealed sandwich that holds moisture against masonry.
3) What’s the real use-case of the space?
Storage, living space, office, gym, wine cellar, plant room, and light-commercial uses all drive different tolerances for humidity, temperature stability, and access for maintenance.
4) Who needs access later?
You may want future access to plumbing, electrical, sump systems, or inspection points, so consider panels, service cavities, or modular components rather than permanent closures everywhere.
5) What’s the risk appetite for disruption?
A “belt and braces” approach can mean more steps (and cost), but it often reduces rework risk, especially if trades are coming and going and timelines are tight.
Common mistakes that create expensive do-overs
Finishing before diagnosing.
Painting, panelling, or framing a wall before you identify the moisture source usually hides symptoms, not causes.
Assuming a dehumidifier is a fix.
Dehumidifiers help manage indoor humidity, but they don’t solve bulk water entry, poor drainage, or unsealed air leaks that feed condensation.
Using the wrong insulation in the wrong place.
Some insulation choices can trap moisture against cold masonry or create cold spots that become condensation magnets.
Skipping air sealing.
Air leakage is a major driver of condensation because warm, moist air finds cold surfaces inside wall cavities and drops water.
Building a “perfect” wall with no maintenance path.
Even good systems need occasional inspection; blocking access to known risk areas is a long-term headache.
Treating basements like above-ground rooms.
Basements behave differently; copy-pasting standard internal wall details often backfires.
A simple first-actions plan for the next 7–14 days
Days 1–2: Map the symptoms.
Note where you see staining, efflorescence (white salts), musty smells, or peeling finishes, and whether they correlate with rain events or seasonal changes.
Days 3–4: Check the basics outside.
Confirm roof runoff is being directed away, gutters are working, downpipes discharge clear of the footing, and ground levels slope away where possible.
Days 5–6: Measure and monitor.
Use a basic hygrometer to track humidity, and look for temperature differences at walls and corners; these often explain where condensation will form.
Days 7–9: Decide your “drying strategy.”
Choose whether the assembly should prioritise drying inward, outward, or both (where feasible), based on your climate, construction type, and waterproofing reality.
Days 10–14: Lock the sequence.
Schedule works in the right order: drainage/waterproofing first (if needed), then air sealing and insulation strategy, then wall finish, so you’re not undoing brand-new work.
Operator experience moment
On basement projects that went smoothly, the winning move was almost always slowing down at the start to test assumptions, especially around where moisture was coming from and how the wall could dry.
On the ones that went sideways, the trigger was usually rushing to make the space “look finished,” then discovering the wall assembly had trapped moisture behind it.
That early, slightly boring diligence tends to save the most frustration later.
Picking an approach: DIY, hybrid, or fully managed
DIY can work when moisture risk is low, the wall is already dry and stable, and the goal is basic storage or a light upgrade. The trade-off is that you’re relying on your own sequencing, detailing, and willingness to revise if monitoring shows unexpected humidity behaviour.
Hybrid approaches suit many real-world basements: you bring in specialists for drainage, waterproofing, electrical, or HVAC, while handling simpler interior finishing yourself. The main decision factor is coordination, ensure each trade’s work supports the drying and air-sealing strategy rather than undermining it.
Fully managed solutions make sense when you need predictable timelines, repeatable detailing, and a wall outcome that’s designed as a system rather than built up ad hoc. If a system-style approach is on the table, this Rise Products basement wall guide can help compare what’s involved before locking in materials or timelines.
Local SMB mini-walkthrough (Australia + United States)
A small operator with a basement-level workspace starts with a simple brief: “We need clean walls, less humidity, and no surprises during fit-out.”
In Sydney, attention goes to seasonal humidity and airflow management as much as rain events.
In the US Midwest or Northeast, the conversation quickly includes freeze-thaw cycles and how cold masonry drives condensation.
Step one is an on-site moisture check and a plain-English drying plan everyone can follow.
Step two is locking the scope: what must be fixed outside vs what’s managed inside.
Step three is sequencing trades so wall finishing happens only after the risk drivers are controlled.
Step four is setting inspection access points so maintenance doesn’t require demolition.
Practical opinions
Prioritise drying pathways over “perfect sealing” everywhere.
Spend effort on sequencing before spending money on finishes.
Choose wall details that make inspection and repairs easy.
How to choose materials and detailing without overcomplicating it
Start by thinking in layers: water control, air control, vapour control, thermal control, then finish.
Water control: If there’s any chance of bulk water, address it before interior finishes, drainage, sump systems, crack management, and exterior grading are often higher-leverage than internal patching.
Air control: Air leaks move moisture; sealing rim joists, penetrations, and junctions often reduces condensation risk more than people expect.
Vapour control: This is climate- and assembly-dependent, and it’s where one-size-fits-all advice causes trouble. The goal is not “block all vapour” but “avoid trapping moisture,” which may mean allowing drying to one side while controlling air movement.
Thermal control: Insulation choices should reduce cold-surface opportunities (where indoor humidity condenses) without creating hidden cavities that can’t dry.
Finish: Pick finishes that suit the real use-case, impact resistance for storage, cleanability for workspace, moisture tolerance for any area that might see dampness, and removable access where future changes are likely.
A final check before committing: if the wall got damp tomorrow, would your design help it dry, or hide it?
Key Takeaways
- Diagnose moisture type (bulk water vs condensation) before choosing finishes.
- Build in a drying pathway; avoid wall assemblies that trap moisture.
- Sequence work so drainage and air sealing come before interior wall finishing.
- Choose an approach (DIY, hybrid, managed) based on coordination risk and future access needs.
Common questions we hear from Australian businesses
Q1) Should a basement wall be sealed before finishing?
Usually… sealing is part of the picture, but the more important question is whether the wall assembly can dry if moisture shows up. Next step: document where moisture could come from (rain events, plumbing, condensation) and choose a detail that allows drying to at least one side; in many Australian climates, humidity swings make airflow and air sealing especially relevant.
Q2) Is mould always a sign of a leak?
It depends… mould can come from bulk water, but it can also form from condensation on cold surfaces even when there’s no obvious leak. Next step: track indoor humidity for a week and look for cold corners or uninsulated sections; in both Australia and the US, seasonal changes can reveal patterns you won’t see on a single inspection day.
Q3) How do we decide between DIY and bringing in a contractor?
In most cases… the deciding factor is risk and coordination: if drainage, waterproofing, electrical, or HVAC changes are involved, professional help reduces the chance of conflicts between trades. Next step: write a simple scope and sequence list (what happens first, second, third) and get quotes aligned to that order; this is especially helpful when trades availability differs between metro Australia and many US regions.
Q4) What’s the fastest way to make a basement feel “finished” without regret?
Usually… the fastest safe path is the one that doesn’t require rework: control moisture drivers first, then choose a finish that doesn’t block inspection access. Next step: identify one inspection point per wall run (corner, service line, or low point) and design around easy access; this matters in older Australian stock with retrofits and in many US basements with multiple generations of plumbing and wiring.


Sign in to leave a comment.